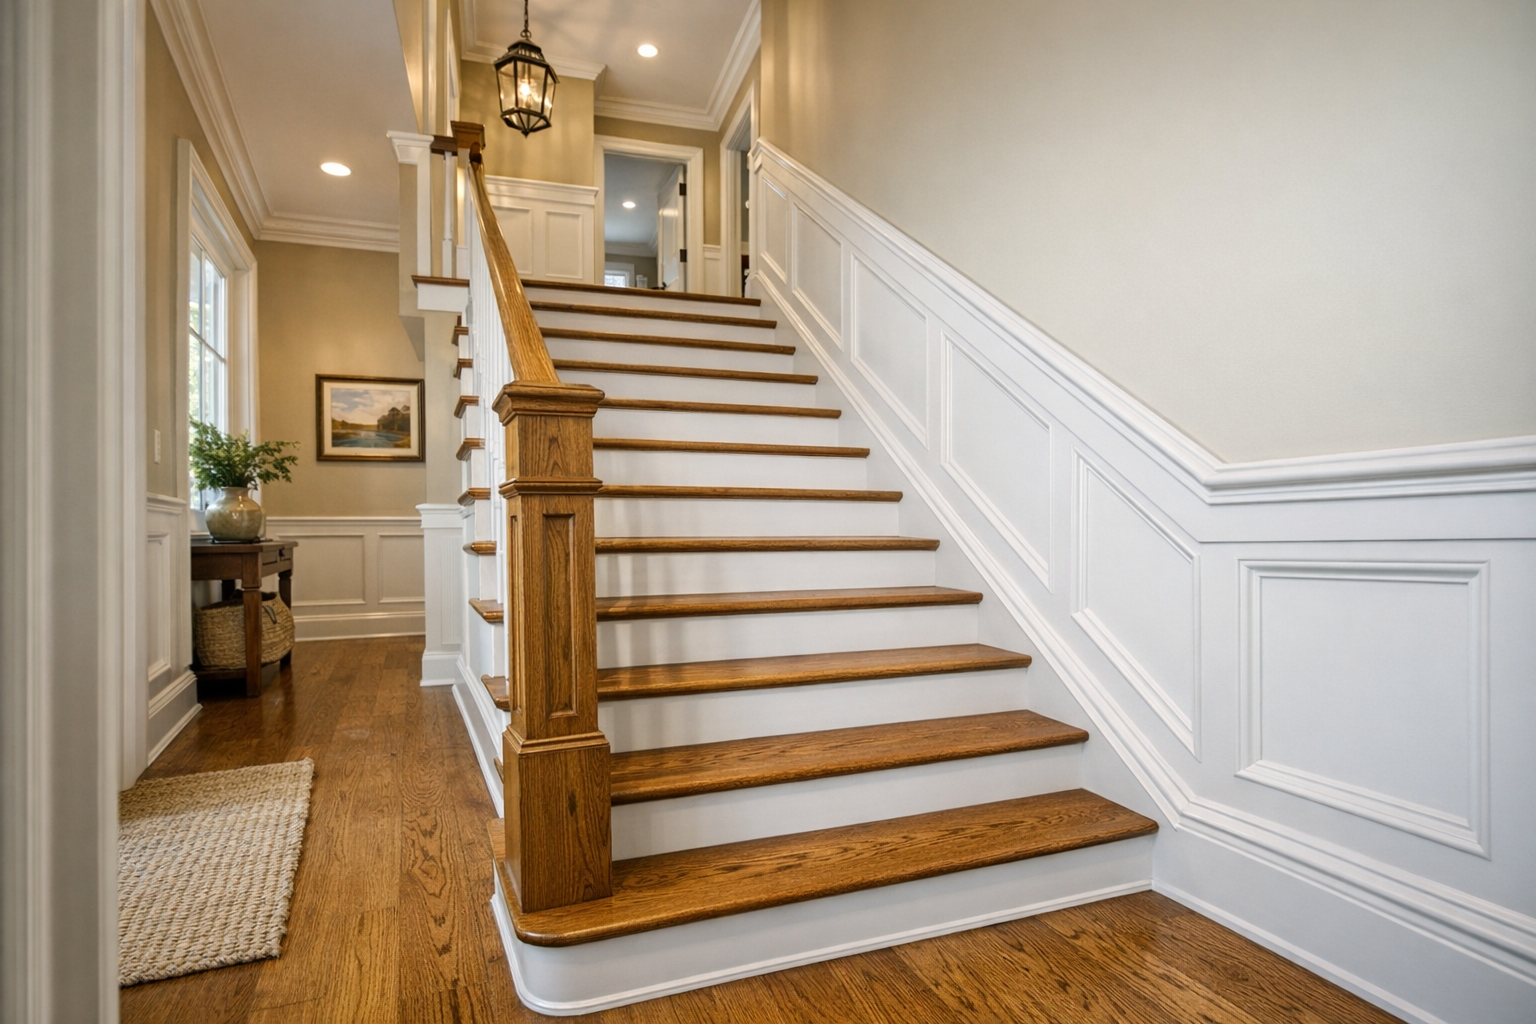
On a staircase, the details that matter are the sloped edges, the exposed wall, and the places where treads, risers, landings, and baseboards meet. As a finish carpentry service, this upgrade uses trim, molding, skirt boards, and wall paneling to frame the stairway so it feels intentional, polished, and connected to the rest of the home.
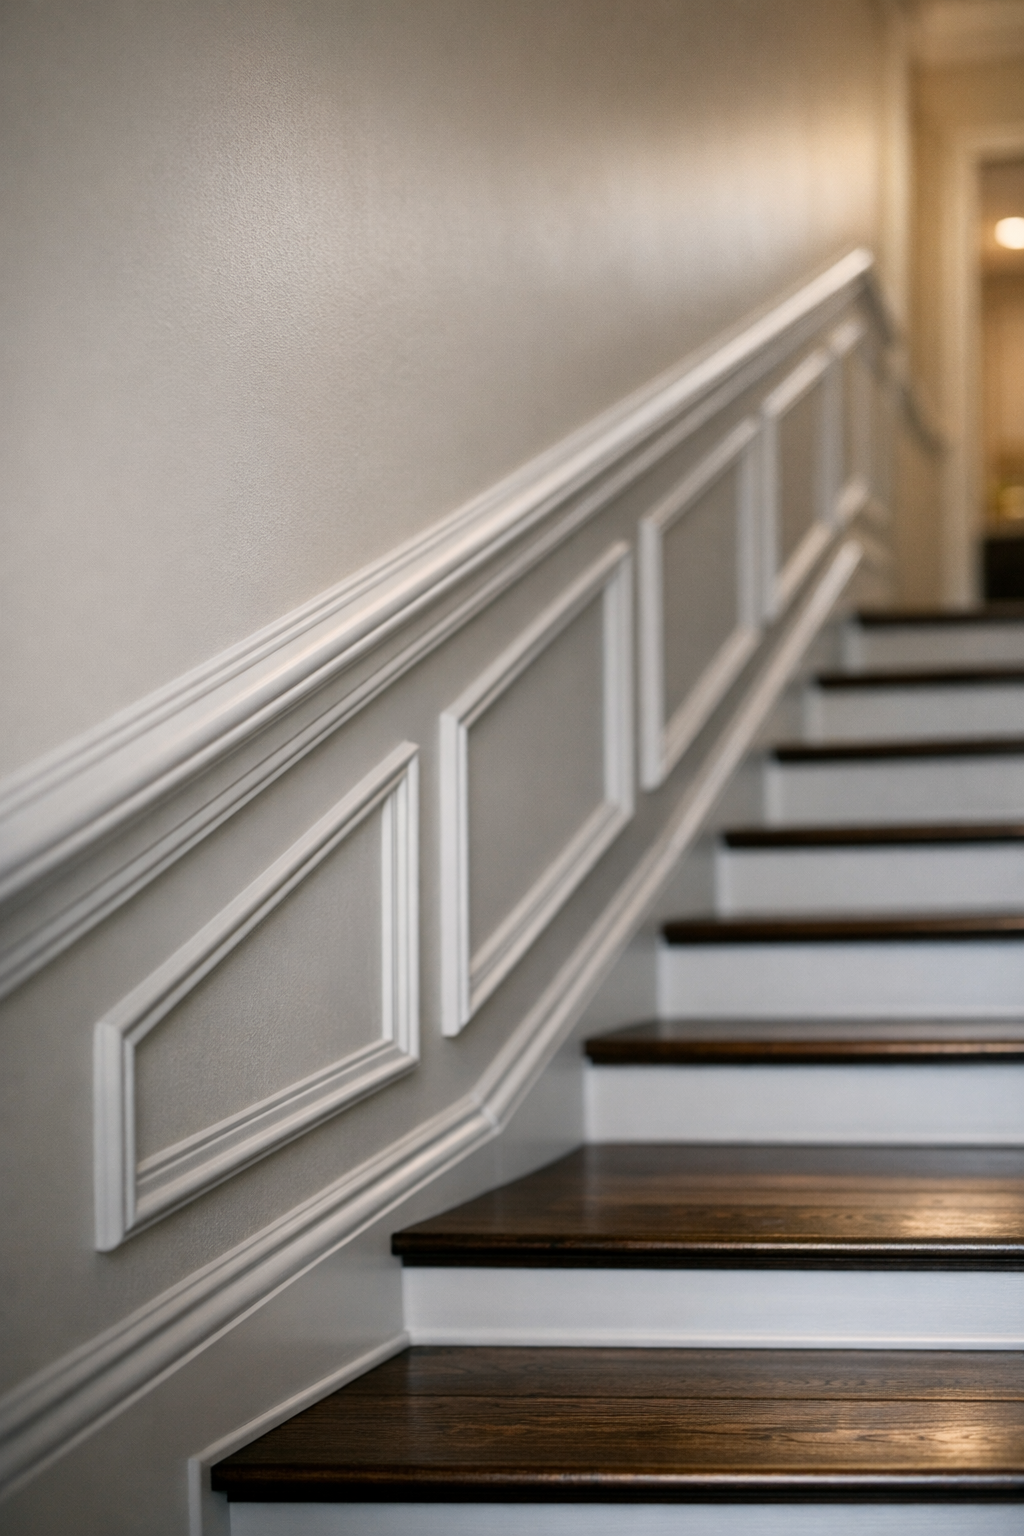
Each element has a job. A skirt board runs along the stair line and gives the treads and risers a cleaner edge. Molding adds shadow lines and definition. Wainscoting brings panel detail to the wall, creating an architectural feature while helping shield a busy stairway from scuffs, hand marks, and everyday wear.
The right design depends on the staircase itself, not just a photo of a style you like. A straight closed stairway may call for a different layout than a stair with a landing, turn, open railing, uneven wall, or existing baseboard transitions. Home style matters too: a simple, clean panel layout can feel understated, while heavier trim profiles create a more traditional look. Professional installation is about making those choices work with the stair angle, wall condition, and finished details so the upgrade looks built in rather than added on.
Why Upgrade a Stairway With Trim or Wainscoting?
A stairway usually reads as one long visual line, so even modest staircase trim can change how finished the whole area feels. Added profiles create depth and shadow, giving the wall something to relate to besides paint. That helps the stairs feel framed instead of floating between rooms, especially where the stair run meets an entry, hallway, or upper landing.
There is a practical side, too. Stair walls are easy places to bump with hands, bags, laundry baskets, and furniture, and wainscoting gives those high-contact surfaces a more durable, washable finish than a plain painted wall alone. Stairway molding can also soften awkward transitions where baseboards stop, skirt boards meet landings, or the wall line changes direction.
The best results come from restraint and fit, not just adding more millwork. A clean layout can connect the staircase to nearby door casing, baseboards, railings, and room trim, while an oversized or poorly aligned design can make the same stairway feel busy. The takeaway is simple: the upgrade can add polish, protection, and architectural character, but its impact depends on design quality, the home's style, and the precision of the workmanship.
Stair Trim and Wainscoting Options for Different Staircases
On a real stair run, the choice is less about picking a favorite molding and more about deciding how much of the wall should participate. Stair pitch, landings, railing interruptions, wall condition, and nearby baseboards all affect whether a simple trim upgrade or a fuller wainscoting layout will look balanced.
- Stair skirt board: This is the long trim board that follows the stair angle along the treads and risers. It gives the stair edge a cleaner frame and helps tie the steps into the wall. It is a strong fit when the stair edge looks unfinished or the base transition feels choppy; it is a weaker fit if the existing stair construction leaves too little room for a clean reveal.
- Stair baseboard trim: Base trim follows the lower wall line along the stair slope and landings. It is simpler than full paneling and works well when you want a neat, finished edge without making the wall busy. It can feel underwhelming on a tall blank stair wall that needs more visual structure.
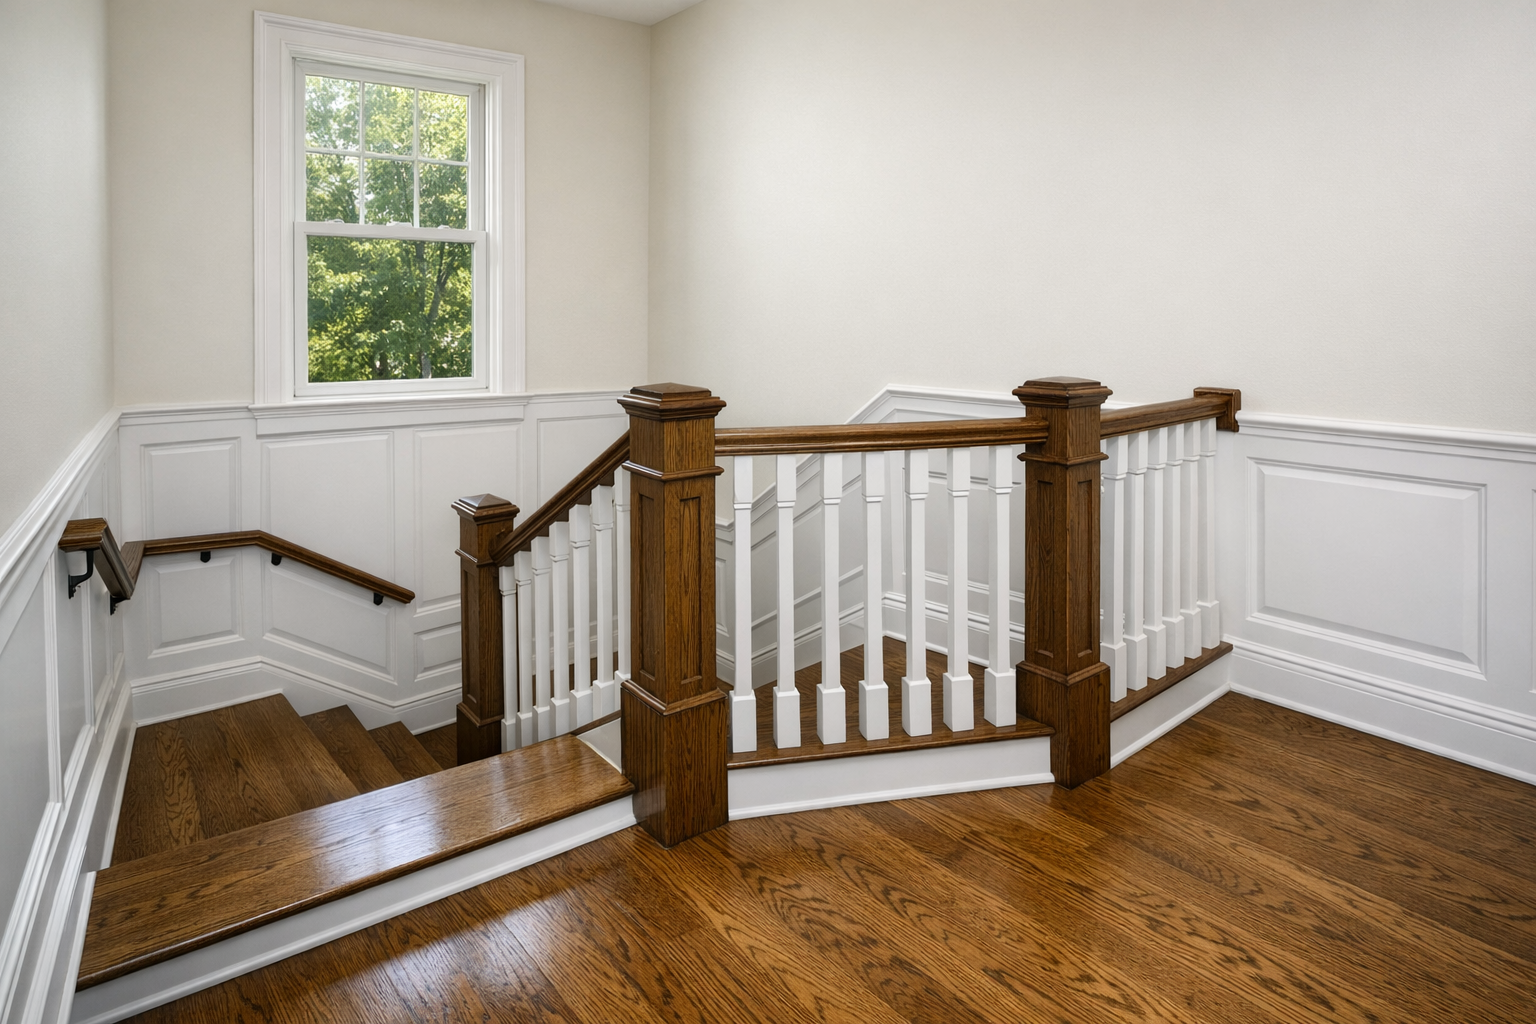
- Chair rail on stairs: A chair rail creates a horizontal-feeling cap that steps or angles with the stair run. It defines the top of a wainscot area and adds a hand-height visual line. It suits traditional and transitional homes, but it needs careful height planning around handrails so the two lines do not compete.
- Picture frame molding: This uses applied molding rectangles or parallelograms on the wall surface. It gives a tailored look without covering the entire wall. It is a strong fit for clean, classic stairways and narrow stairs because the profiles can stay shallow; it is weaker where uneven walls would make the frames look wavy.
- Board and batten: Vertical battens create a more casual, structured rhythm. This option works well in transitional, cottage, and modern farmhouse spaces because the lines are simple and bold. It can be less successful on very short angled wall sections where the spacing becomes cramped or inconsistent.
- Beadboard: Beadboard uses narrow vertical grooves for texture. It adds wall protection and a relaxed character, especially on back stairs, cottage-style entries, and lower-height wainscoting. It may not be the best fit for a formal stair hall if the home's existing trim is more substantial or refined.
- Shadow boxes: Shadow box trim is similar to picture frame molding but often used in repeated panels below a chair rail. It adds depth while keeping the wall mostly painted drywall. It is a good middle ground for custom stair trim when you want detail without the weight of full wood paneling.
- Raised panel wainscoting: Raised panels have thicker profiles and a more formal, furniture-like appearance. They can look excellent in traditional homes with generous wall height and prominent casing, but they can overpower a tight stairwell or clash with very minimal trim nearby.
- Full staircase wall paneling: This approach treats the stair wall as a complete composition, combining rails, stiles, panels, caps, and landings into one layout. It delivers the most architectural effect, but it also demands the most precise planning because panel spacing, stair angle, railing height, and landing transitions all need to line up cleanly.
Choosing a Design That Fits the Stair Layout, Wall Height, and Home Style
The most useful design choices start with the actual staircase measurements: the pitch of the run, the height of the wall above the treads, the length of each landing, and where the stair turns or opens to another room. A steep stair compresses the visual space, so a lighter panel layout often reads cleaner. A long straight wall can handle more repetition, while a landing or turn may need a pause point where the trim changes direction instead of forcing one pattern through every angle.
Closed stairways usually give the installer one continuous wall to organize, which can suit picture-frame molding, board and batten, or raised panels depending on scale. Open stairways have railings, balusters, exposed stringers, and sightlines from nearby rooms, so the trim needs to support those features rather than compete with them. Rail height matters because a chair rail or cap that runs too close to the handrail can create crowded parallel lines.
Wall height and home style decide how much visual weight the design should carry. Simple picture-frame molding is often a good fit for tighter stairwells because it adds shape without thick buildup. Raised panels are stronger in more formal homes with taller walls, larger casing, and enough room for panels to breathe. They are a weak fit where the ceiling feels low, the stair wall is broken into short sections, or nearby trim is very minimal.
Wall condition is part of the design decision, not just an installation issue. Flat walls can support crisp shadow lines and even spacing; wavy walls may call for simpler profiles, adjusted reveals, or a painted finish that is more forgiving. For wainscoting on stairs, the best panel layout also relates to existing baseboards, door casing, tread edges, and landings so the finished stair trim and wainscoting looks built into the home rather than added afterward.
What Professional Stair Trim Installation Involves
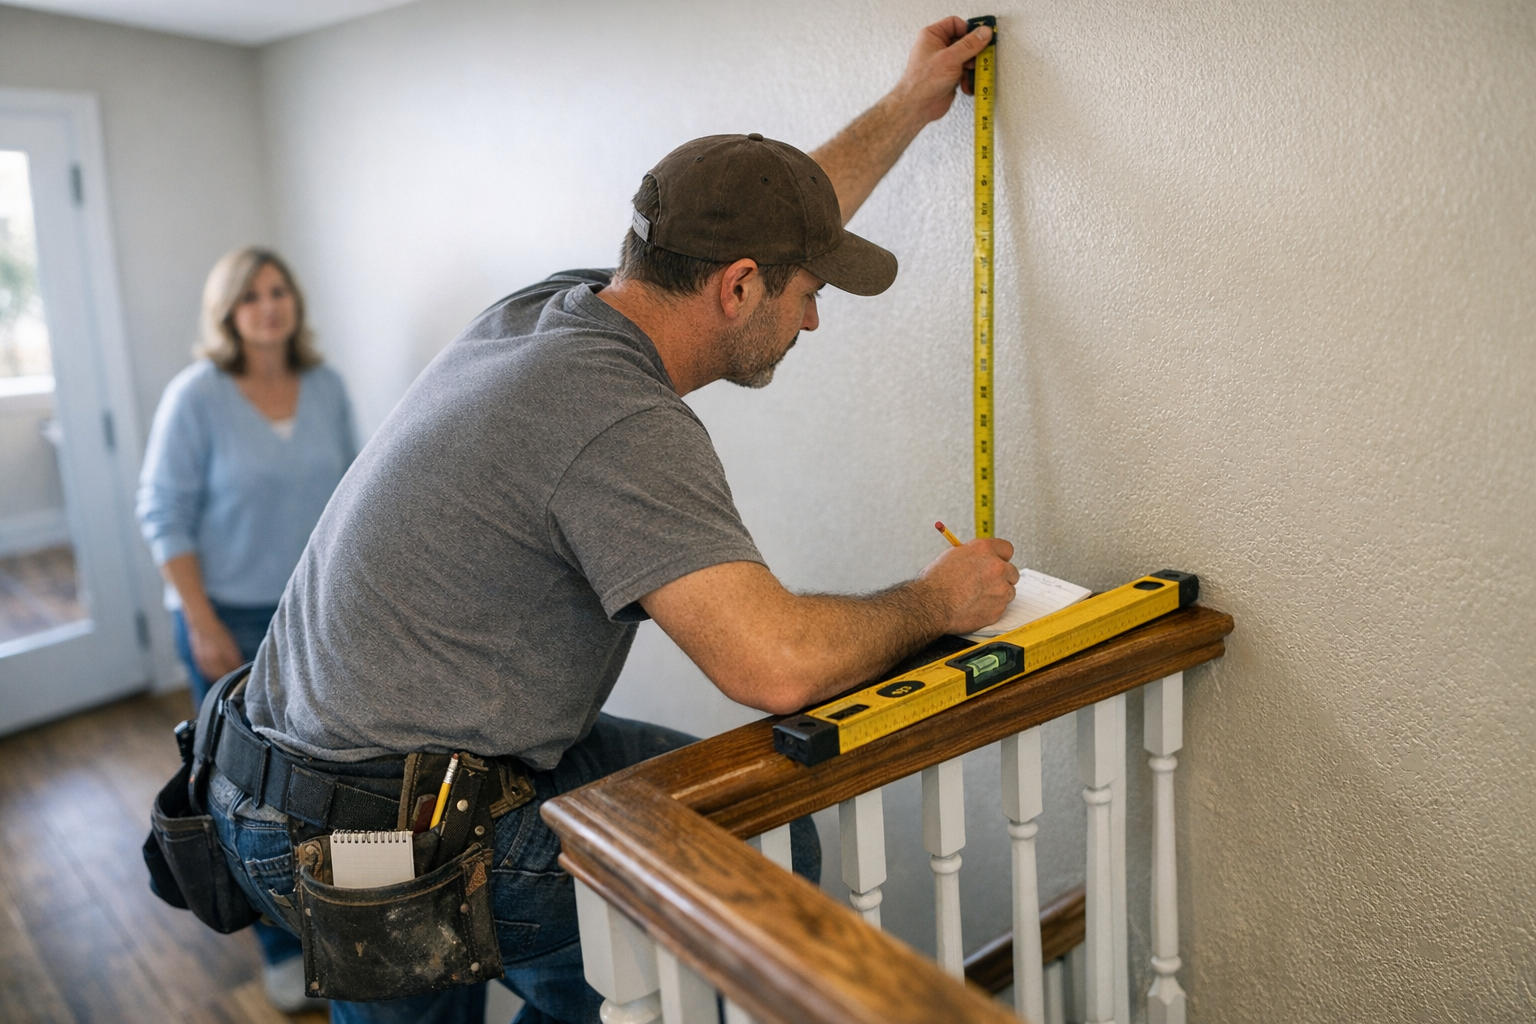
Professional installation starts before any boards are cut. The consultation is where the installer measures the stair run, notes the pitch, studies landings and turns, and talks through the design, materials, finish, and schedule for the specific staircase. That matters because a sloped stair wall does not behave like a straight hallway: one uneven reveal, drifting rail line, or poorly placed panel can repeat visually all the way up the stairs.
From there, the layout is planned so the stair trim and wainscoting line up with treads, risers, baseboards, handrails, casing, and landing transitions. Panel spacing is usually worked out as a full composition rather than one piece at a time. A strong layout keeps repeated panels consistent along the slope and gives corners, rail interruptions, and landings a deliberate stopping point; a weak layout lets the pattern crash into obstacles or taper awkwardly near the top or bottom.
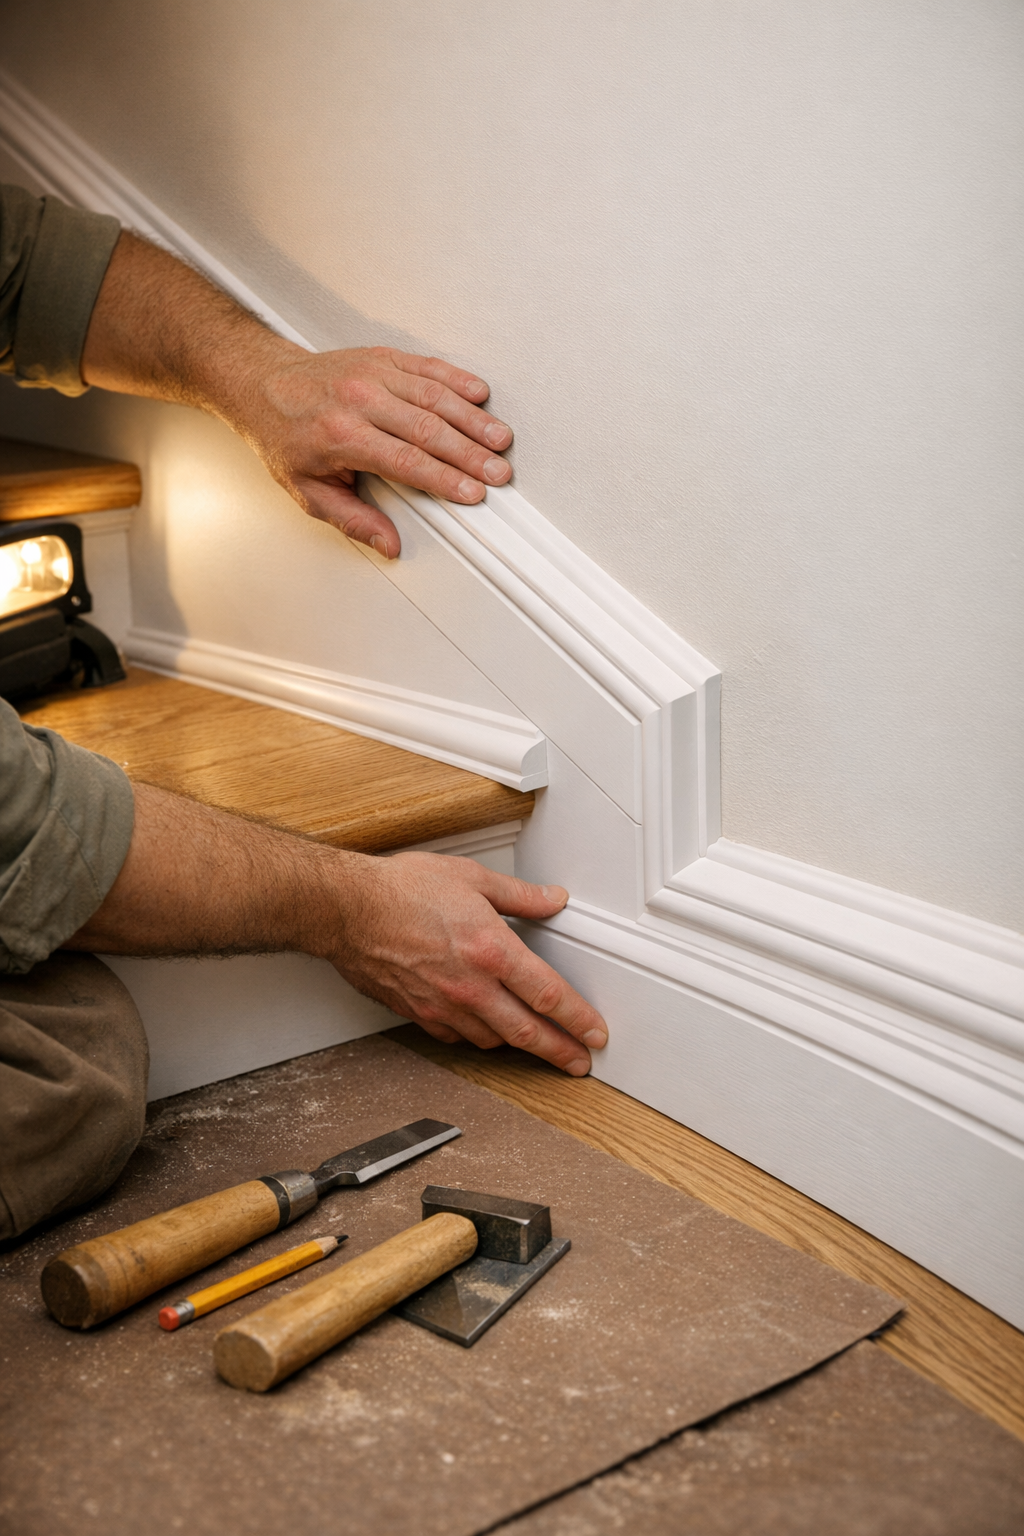
During installation, the visible quality is in the joinery. Miters are angled cuts used where trim changes direction, coped joints are shaped joints that help inside corners close cleanly, and returns are small finished ends that keep a profile from stopping as a raw cut. These details are easy to overlook in a sketch, but on a staircase they sit at eye level as you move past them, so tight corners and clean terminations make a noticeable difference.
After the pieces are cut and fitted, the installer fastens the trim securely, fills or caulks appropriate seams, sands transitions, and prepares the surface for primer and paint or for stain when the design calls for exposed wood. The goal is not just to attach molding to the wall; it is to make the parts read as one continuous finish carpentry package. Cleanup at the end should leave the stairway usable, with cutoffs, dust, and installation debris removed so the finished work is the focus.
Materials and Finishes for Stairway Wainscoting
Material choice is where the design starts to feel practical. For painted stairway wainscoting, paint-grade trim is usually selected for a smooth, consistent finished look rather than a visible wood grain. MDF can work well for broad painted panels and flat wall sections, while poplar is a common paintable wood choice when the design needs sharper edges, slimmer profiles, or pieces that may take more handling during fitting.
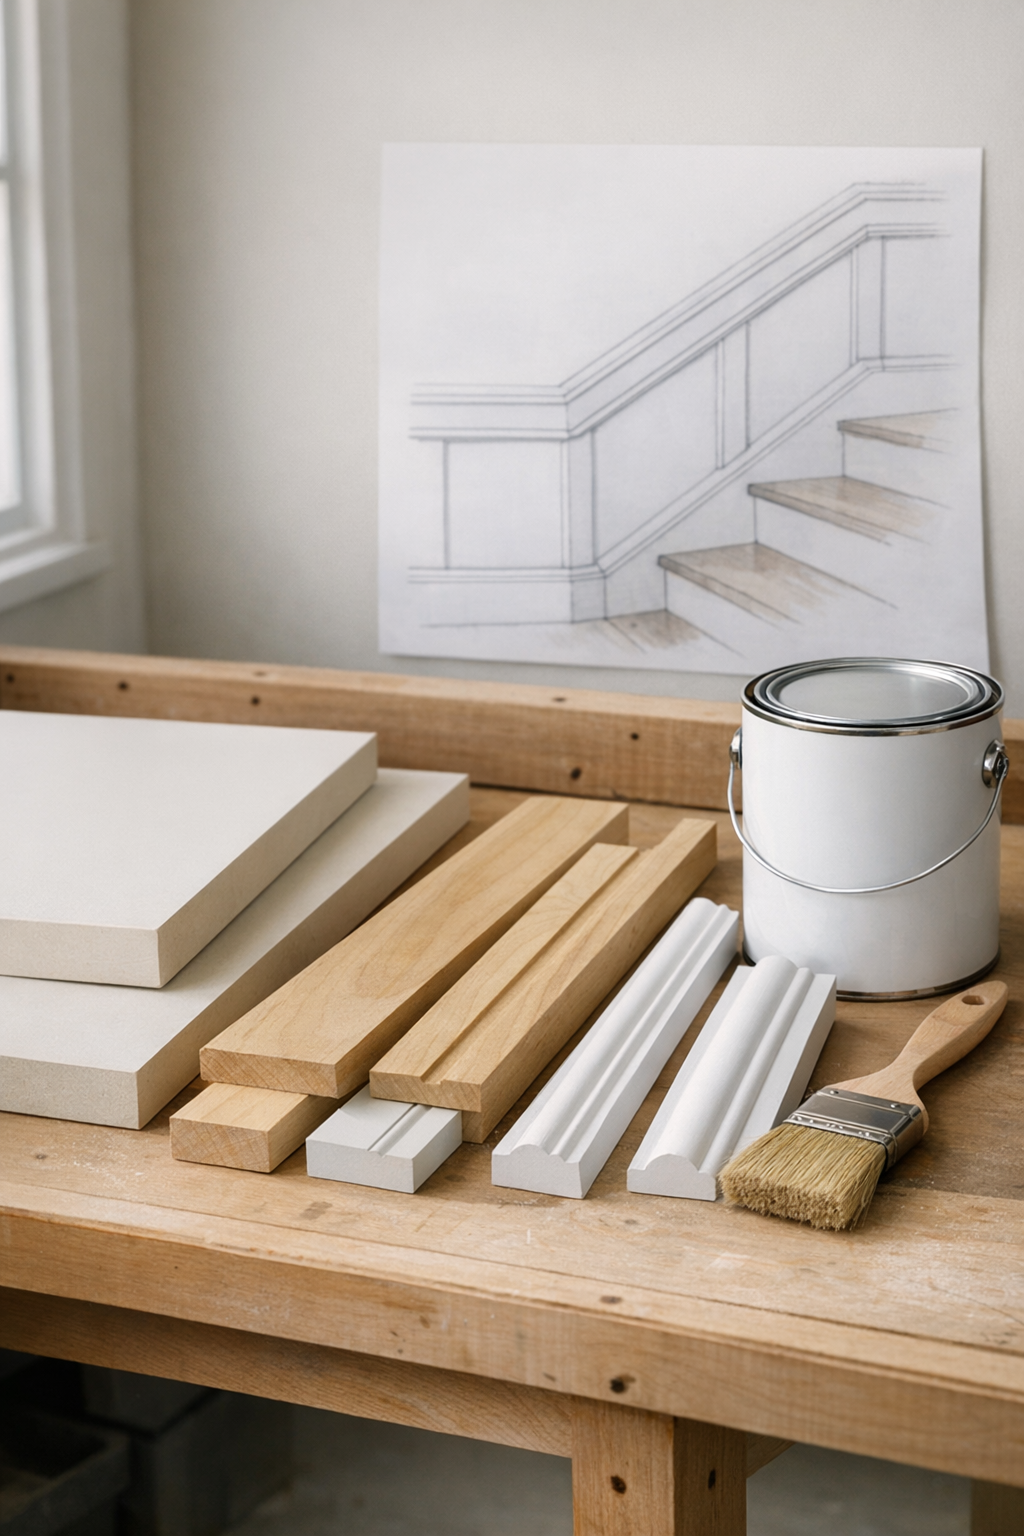
Hardwood and stain-grade wood change the goal. Instead of hiding the material under paint, the finish is meant to show grain, tone, and natural variation, so board selection and joint placement become more visible. This can look rich on a traditional staircase or where the stair parts are already stained, but it is less forgiving than paint if walls are wavy, joints shift, or the surrounding trim is already painted.
Finish choices matter just as much as the boards. Paint color can blend the millwork into the wall for a quiet, built-in look, or contrast with the wall color so the panel layout stands out. Sheen affects both style and upkeep: a flatter finish looks softer, while a satin or semi-gloss finish typically reads crisper on trim and is often preferred where hands, bags, and daily traffic may brush the stair wall.
The best selection balances budget, design goals, wall condition, and expected wear. A simple painted profile may be the right call for a busy family stairway, while stain-grade details may be worth it when the staircase already has wood treads, posts, or rails that deserve to be matched carefully.
Adding Wainscoting to an Existing Staircase: Clearances, Condition, and Maintenance
Start with the obstacles already on the wall: rail brackets, switches, outlets, vents, patched drywall, and the width of the stair run. In many existing homes, stair wall paneling can be added as a retrofit finish-carpentry upgrade, but the layout still has to respond to the stair pitch, the rail line, the baseboard condition, and the way the stair wall meets treads, risers, and landings.
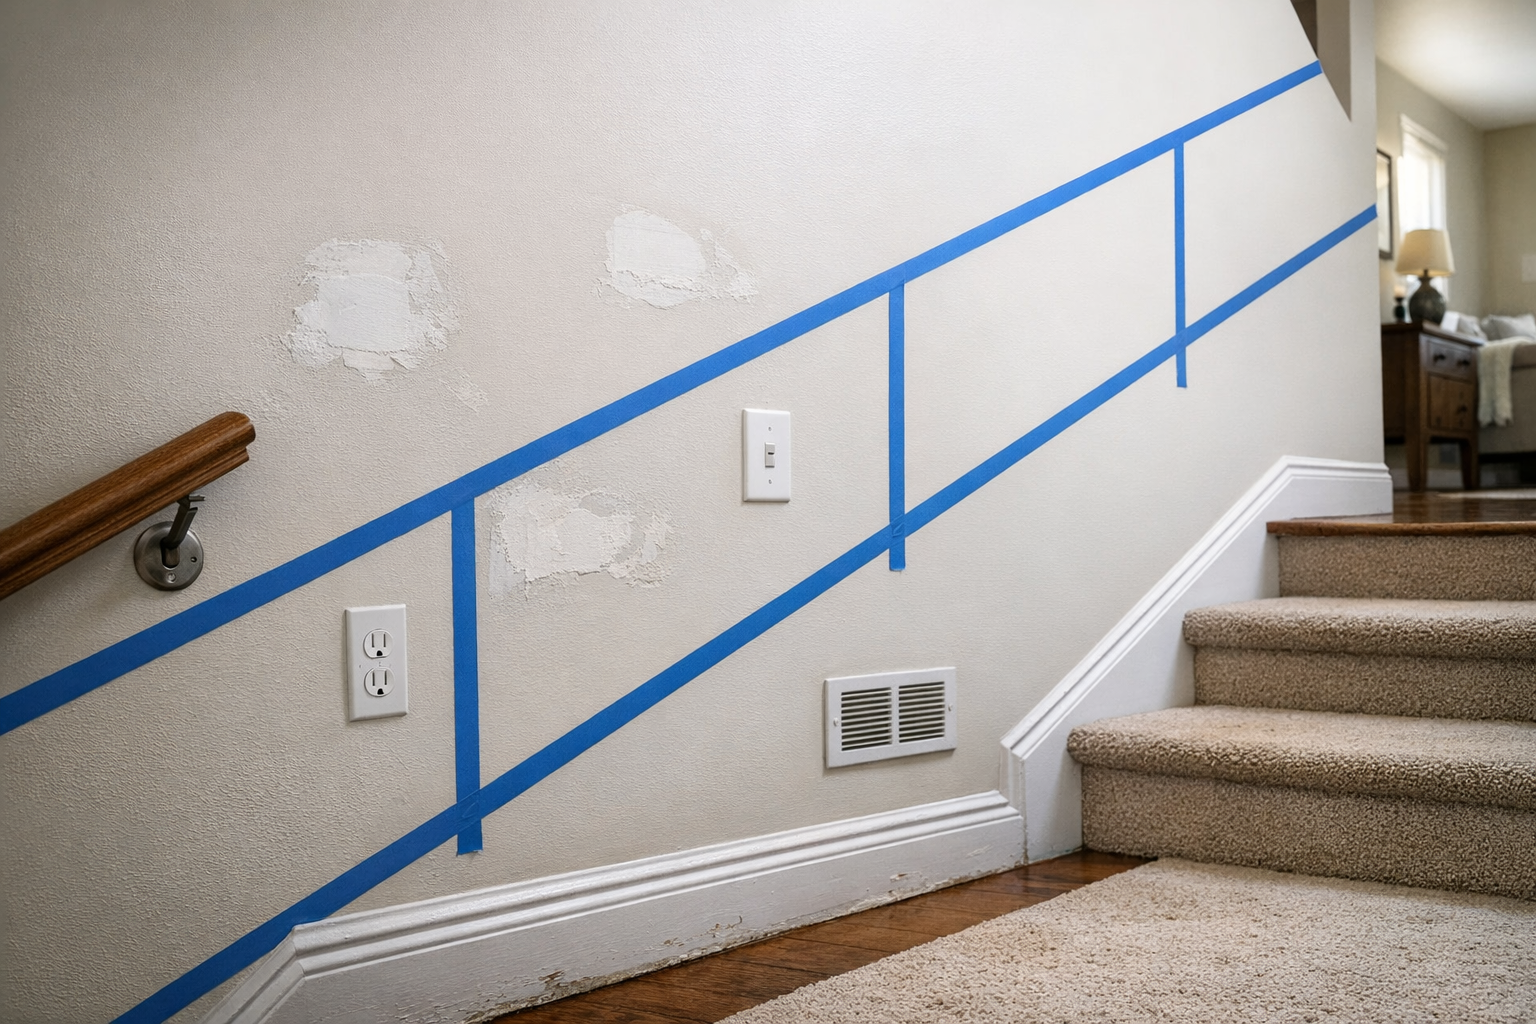
A good pre-installation review looks for the details that can interrupt the pattern: dents or old patching in the drywall, uneven wall planes, rail brackets, switches, outlets, vents, door casing, skirt boards, and trim transitions at the top and bottom of the run. These items change panel size and placement. For example, a switch may need to sit cleanly inside one field area, while a handrail bracket may require the staircase wainscoting to pause, step around it, or use a simpler profile so the rail remains comfortable to use.
Clearance matters because trim adds thickness to a space people move through every day. The design should not make a narrow stair feel tighter, crowd the handrail, or create awkward raised edges where hands, bags, or furniture are likely to brush the wall panels. Code-sensitive areas should be respected rather than treated as decorative obstacles.
Maintenance is straightforward when the finish is planned well. Painted panels can be wiped clean as needed, scuffs can usually be touched up, and caulked seams should be inspected over time where seasonal movement may open small lines between trim and wall.
Schedule a Stair Trim and Wainscoting Consultation
If the stairway is ready for a closer look, the next step is a focused consultation. Expect measurements of the run, pitch, landings, wall height, rail placement, and trim transitions, followed by a style conversation about the level of detail that fits your home. This is also where material choices, paint or stain plans, and custom stair trim details can be narrowed down before a quote is prepared.
Your installation timeline should be tailored to the staircase, not guessed from a generic wall-paneling project. Duration can vary with staircase size, panel complexity, finishing method, and any wall preparation needed before the trim is installed. To start planning stair trim and wainscoting that looks integrated instead of added on, request a consultation for measurements, design guidance, material recommendations, and a clear project scope.
FAQs
Can you install wainscoting on a staircase?
Yes, wainscoting can be installed on a staircase as a retrofit finish carpentry upgrade. The layout must account for stair pitch, landings, rail brackets, switches, outlets, vents, baseboards, treads, risers, and handrail clearance.
Is stair trim different from regular baseboard trim?
Yes, stair trim is planned around sloped edges, treads, risers, landings, and handrails, while regular baseboard trim usually follows a flat wall and floor line. A stair skirt board follows the stair angle along the treads and risers, and stair baseboard trim follows the lower wall line along the stair slope and landings.
How high should stairway wainscoting be?
Stairway wainscoting height should be based on the stair pitch, wall height, handrail height, landings, and nearby trim transitions. A chair rail or cap should not run too close to the handrail because crowded parallel lines can make the stairway look busy and reduce comfort.
What materials are best for stairway wainscoting?
Paint-grade MDF works well for broad painted panels and flat wall sections, while poplar is a common paintable wood choice for sharper edges, slimmer profiles, and pieces that need more handling during fitting. Hardwood or stain-grade wood is best when the staircase already has stained treads, posts, or rails that need to be matched.
What type of wainscoting looks best on stairs?
The best type depends on the stair layout, wall height, home style, and nearby trim. Picture frame molding works well in tighter stairwells, board and batten suits transitional, cottage, and modern farmhouse spaces, and raised panel wainscoting fits more formal homes with taller walls and larger casing.