
A trim project feels much easier when you know what happens next. Our trim installation process is organized around a simple path: we start with your inquiry, learn the rooms and goals, review measurements and site conditions, define the scope, schedule the work, install the trim, coordinate finishing details, clean up, and walk through the finished result with you. The exact timing and complexity can vary from one home to another, but the goal stays the same: keep the project clear before, during, and after your estimate request.
That process applies to many finish carpentry details, including baseboards that cover the floor-to-wall transition, casing that frames doors and windows, crown molding that finishes the wall-to-ceiling line, wainscoting that adds panel detail to walls, accent walls, and custom millwork. Some projects are one room; others move room by room through an occupied home, so we plan around access, existing conditions, and the details that need to be verified on site.
You do not need every profile, finish, or measurement figured out before reaching out. A helpful first conversation can start with the rooms involved, the look you want, and any photos or examples you already have. From there, we help turn the idea into a clearer finish carpentry process and estimate roadmap. If you are ready to talk through your trim project, request an estimate and we’ll help you take the next step.
Step 1: Tell Us About the Rooms, Trim Goals, and Project Details
For your first project inquiry, start with the basics: where the home is located, which rooms are involved, and what you would like the trim to change visually. City, town, neighborhood, or community name helps us understand the project location, while the room list helps us separate a single-space update from a multi-room interior trim project planning conversation.


- Tell us what type of trim you are considering, even if it is only a rough direction: baseboards for the lower wall line, casing around doors or windows, crown molding at the ceiling, wainscoting on walls, or a custom detail you have seen elsewhere.
- Let us know whether this is new installation, replacement of existing trim, or a profile-matching project where new pieces need to blend with trim already in the home.
- Photos are helpful if you have them. Wide room photos show layout and access, close-up photos show existing profiles or problem areas, and inspiration photos help communicate the finished look you have in mind.
- Share preferred timing and any known concerns, such as occupied rooms, recent flooring, uneven walls, moisture damage, or areas where furniture may limit access.
You do not need a complete design package before reaching out. Early trim project planning is welcome; the goal at this stage is to collect enough information to understand the direction, identify what needs a closer look, and guide the next step toward a clearer estimate.
Step 2: Consultation, Measurements, and Site Review
The consultation is where the rough idea becomes a room-by-room look at what the work will actually involve. We walk the areas being considered, take measurements, and note where trim will start, stop, turn corners, meet flooring, frame openings, or tie into existing details so the trim installation estimate is based on the home in front of us, not a guess from a photo.


- Room dimensions help us calculate linear footage for baseboards, crown, chair rail, or other running trim, while wall areas help clarify panel layouts such as wainscoting or accent details.
- Door and window openings are reviewed because casing quantities, opening sizes, reveal lines, and existing jamb conditions can change the amount of material and fitting involved.
- Wall conditions matter because bowed walls, uneven corners, prior repairs, texture changes, and out-of-square transitions can affect how trim sits and how much fitting or finishing coordination may be needed.
- Ceiling height and ceiling-to-wall transitions are especially important for crown molding, since tall rooms, angled ceilings, tray ceilings, and room-to-room changes can affect layout and access.
- In an occupied home, we also look at furniture, flooring, access paths, pets, work hours, and rooms that need to stay usable so the project can be planned with less disruption.
These details help shape a more reliable finish carpentry estimate Sarasota County homeowners can review with clear expectations. Measurements are important, but they are only one part of the picture; profile choice, material type, existing conditions, removal needs, and finishing assumptions can all affect the final proposal.
Step 3: Define the Scope, Trim Profile, and Materials
After the site review, we narrow the project into a clear scope of work: which rooms are included, which trim details are being added or replaced, and what profile, material, and finish direction should be used for the estimate.
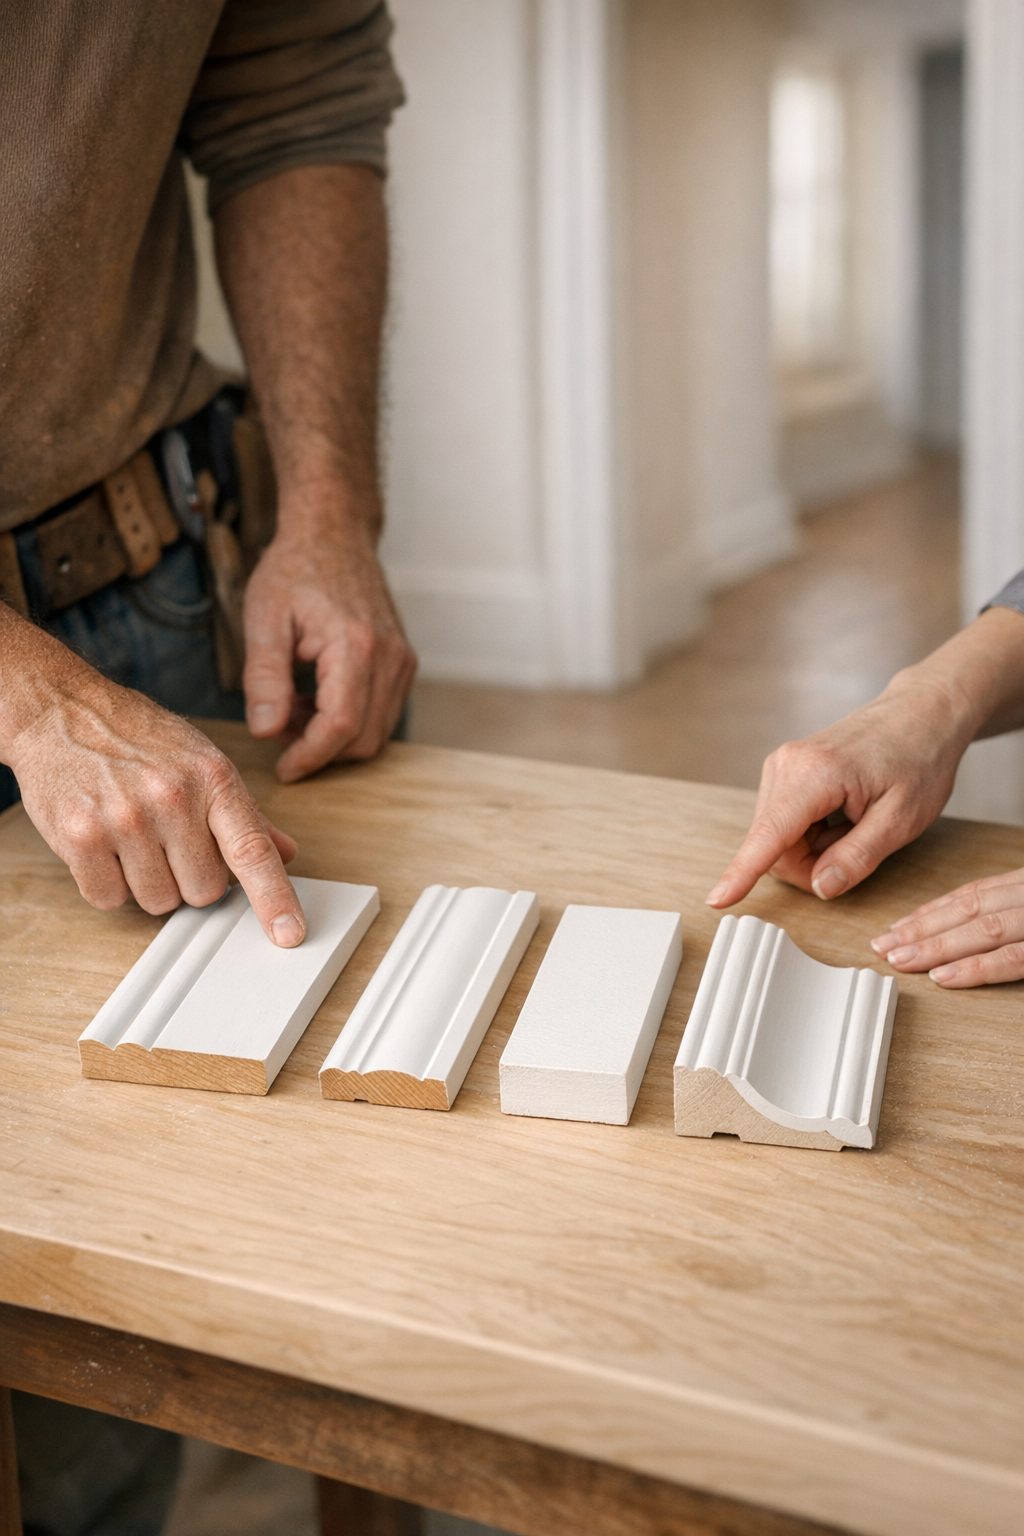
Profile selection is the shape and style of the trim itself. A simple square-edge baseboard gives a cleaner, more modern look, while a taller or more detailed profile can make the room feel more traditional or formal. For crown molding, casing, wainscoting, accent walls, or custom millwork, the profile also affects how the new detail relates to existing doors, windows, ceilings, flooring, and nearby trim.
Material selection is a separate decision from profile. Paint-grade trim is typically chosen when the finished look will be painted, while stain-grade work is selected when the grain and wood character are meant to show. That choice can change the appearance, finishing assumptions, and proposal details, especially when the project needs to match existing trim or coordinate with cabinetry, flooring, or other interior features.
- Baseboards finish the floor-to-wall line and are usually measured by room or linear footage.
- Casing frames doors and windows, so opening count and existing jamb conditions matter.
- Crown molding finishes the wall-to-ceiling transition and may require different planning in rooms with trays, angles, or height changes.
- Wainscoting, accent walls, and custom millwork involve layout choices, panel spacing, and feature-wall proportions.
If you do not know the exact profile you want, that is completely fine. Reference photos, existing trim samples, and style direction help us guide the options, explain the tradeoffs, and build a scope of work that makes the estimate easier to understand before approval.
Step 4: Review the Estimate, Project Plan, and Scheduling Factors
At this point, the conversation should turn into something you can review in writing. Your finish carpentry estimate is meant to be more than a number; it should act like a project roadmap that shows what is included, what is assumed, and what still needs a decision before approval.

- The defined scope lists the rooms and trim details included, so a baseboard-only project is separated from work that also includes casing, crown molding, wainscoting, or profile matching.
- Material notes or allowances explain whether selections are already chosen or still being carried as planning assumptions, which matters when paint-grade, stain-grade, or matching work may change the finishing direction.
- Labor and finishing assumptions help clarify what the estimate is built around, such as removal needs, room complexity, wall conditions, caulk or paint coordination, and how detailed trim layouts may affect the project timeline.
Scheduling is reviewed before the project is approved and placed on the calendar. Start dates and duration can be influenced by project size, profile or material timing, the number of rooms involved, occupied-home access, paint or finishing needs, and the current schedule already in motion.
If you want to add, remove, or revise part of the scope, we address that before approval so the plan stays clear. That way, you are not comparing a vague ballpark to a finished project; you are reviewing a specific plan for the work you actually want completed.
Step 5: Prepare the Home Before Installation Begins
Before installation day, we use the approved plan to make sure the job is ready to start cleanly. This is the preparation step where we review the rooms involved, the trim materials or profiles expected for the project, and any remaining access details so the custom trim installation process does not begin with avoidable confusion.
- Clear the work areas as much as practical, especially along walls, doors, windows, stairways, and built-ins where trim will be installed. Fragile décor, small furniture, lamps, and wall-hung items are best moved before the crew arrives.
- Let us know how the crew should access the home, where parking makes sense, and whether certain rooms need to stay usable during the day. In an occupied home, this helps us plan movement, staging, and communication around everyday routines.
- Tell us about pets, children’s areas, remote work needs, or rooms that require extra coordination. These details do not change the trim itself, but they do help us set expectations before tools, materials, and setup begin.
Trim work can involve cutting, fastening, sanding, caulking, and finishing coordination, so some dust, noise, and temporary disruption should be expected. We plan the work with care, but we do not describe the project as dust-free; the goal is to keep you informed and make installation day feel manageable.
Step 6: Installation, Fit, and Finishing Coordination
Once tools and materials are staged, the work shifts from planning to careful fit. The crew typically starts by confirming the layout in the rooms being worked on: where baseboards stop, where casing meets doors or windows, how crown or panel details line up, and which profile belongs in each area.
From there, trim is cut, fitted, and fastened in a room-by-room sequence. Working this way helps keep the interior trim installation process organized, especially when one space has simple baseboards and another includes casing, crown molding, wainscoting, or profile matching against existing trim.
- Transitions get attention as the work moves through the home. A transition might be where new trim meets existing trim, where flooring changes, where a wall is slightly out of square, or where a run turns a corner. These spots are handled in the field so the finished trim looks intentional rather than pieced together.
- Finishing responsibilities follow the approved scope. Some projects include caulking and nail filling only, some include priming or painting after the trim is installed, and some use pre-primed material or coordinate final paint with a separate painter. The practical takeaway is simple: the estimate should make clear where carpentry stops and where painting or touch-up begins.
- In occupied homes, room access is managed as the work progresses. If certain spaces need to remain usable, the crew can discuss the order of work and daily staging so the trim install process fits the home as well as the project plan allows.
Step 7: Cleanup, Final Walkthrough, and What Happens After
The last stage is about leaving the project settled, not simply stopping when the last piece of trim is installed. Work areas are brought back to a usable condition, loose job materials are gathered, and the installed baseboards, casing, crown, wainscoting, or other finish details are reviewed in the rooms where the work took place.
During the final walkthrough, we look at the completed trim with you and talk through any visible items that need attention. A punch list is a short list of remaining details, such as a touch-up spot, a small caulk line, or a finishing item tied to the approved scope. If painting, staining, or touch-up coordination was included, we clarify what is complete and what still needs to be scheduled or finished.
After completion, you can expect practical care notes based on the work performed and the finish direction used. Paint-grade trim, stain-grade trim, and profile-matched replacement work can each have different follow-up needs, so the takeaway is simple: keep track of any curing, touch-up, or painter coordination discussed at the walkthrough.
If this project leads to another room, a future accent wall, upgraded casing, or a larger trim installation process later on, you can reach back out with the rooms involved, your location, and a few photos. Ready to get started? Request a finish carpentry estimate Sarasota County homeowners can use to move from idea to a clear project plan.
FAQs
What happens during a trim installation estimate?
A trim installation estimate starts with your location, room list, trim goals, photos if available, and any timing or access concerns. The process then includes a consultation, room measurements, site condition review, scope definition, profile and material planning, and a written project plan before scheduling.
How are measurements taken for a trim project?
Measurements are taken room by room to calculate linear footage for baseboards, crown molding, chair rail, or other running trim. Door and window openings, wall areas, ceiling height, corners, flooring transitions, and existing jamb conditions are also reviewed because they affect material quantities and fitting.
Do I need to know which trim profile I want before requesting an estimate?
You do not need to know the exact trim profile before requesting an estimate. Reference photos, existing trim samples, room details, and the look you want are enough to start narrowing options for baseboards, casing, crown molding, wainscoting, accent walls, or custom millwork.
What should homeowners do before trim installation starts?
Homeowners should clear work areas along walls, doors, windows, stairways, and built-ins as much as practical. They should also share parking instructions, home access details, pet or child related concerns, remote work needs, and any rooms that must stay usable during the project.
Should trim be painted before or after installation?
Painting depends on the approved scope and finish direction. Some projects include caulking and nail filling only, some include priming or painting after installation, and others use pre-primed trim or coordinate final paint with a separate painter.