A tight casing reveal, a built-in that lands cleanly between two walls, or a mantel scaled to the room can do more than cover edges; these details make an interior feel finished and intentional. This work covers trim, molding, casing, built-ins, doors, shelving, mantels, wall details, and related millwork measured and fitted after the main framing and drywall are in place.
The difference between standard trim work and custom interior carpentry comes down to fit, proportion, and purpose. Off-the-shelf pieces may cover a joint or edge, while custom work is planned around the room's dimensions, storage needs, architectural style, and transitions between surfaces. That matters in living rooms, kitchens, home offices, entries, hallways, and built-in areas where clean lines or coordinated details help the space feel more cohesive.
Good finish carpentry services should leave you with tight joints, consistent reveals, profiles that relate to the rest of the room, and transitions that look deliberate rather than patched together. If you have a space that needs better storage, cleaner trim, a more polished focal wall, or millwork that matches an existing interior, request a consultation, quote, or project review so the scope can be measured and discussed before work begins.
What Custom Finish Carpentry Includes
In practical terms, the work usually falls into a few visible categories, each serving a different role in how the room reads once the walls, floors, and openings are finished.
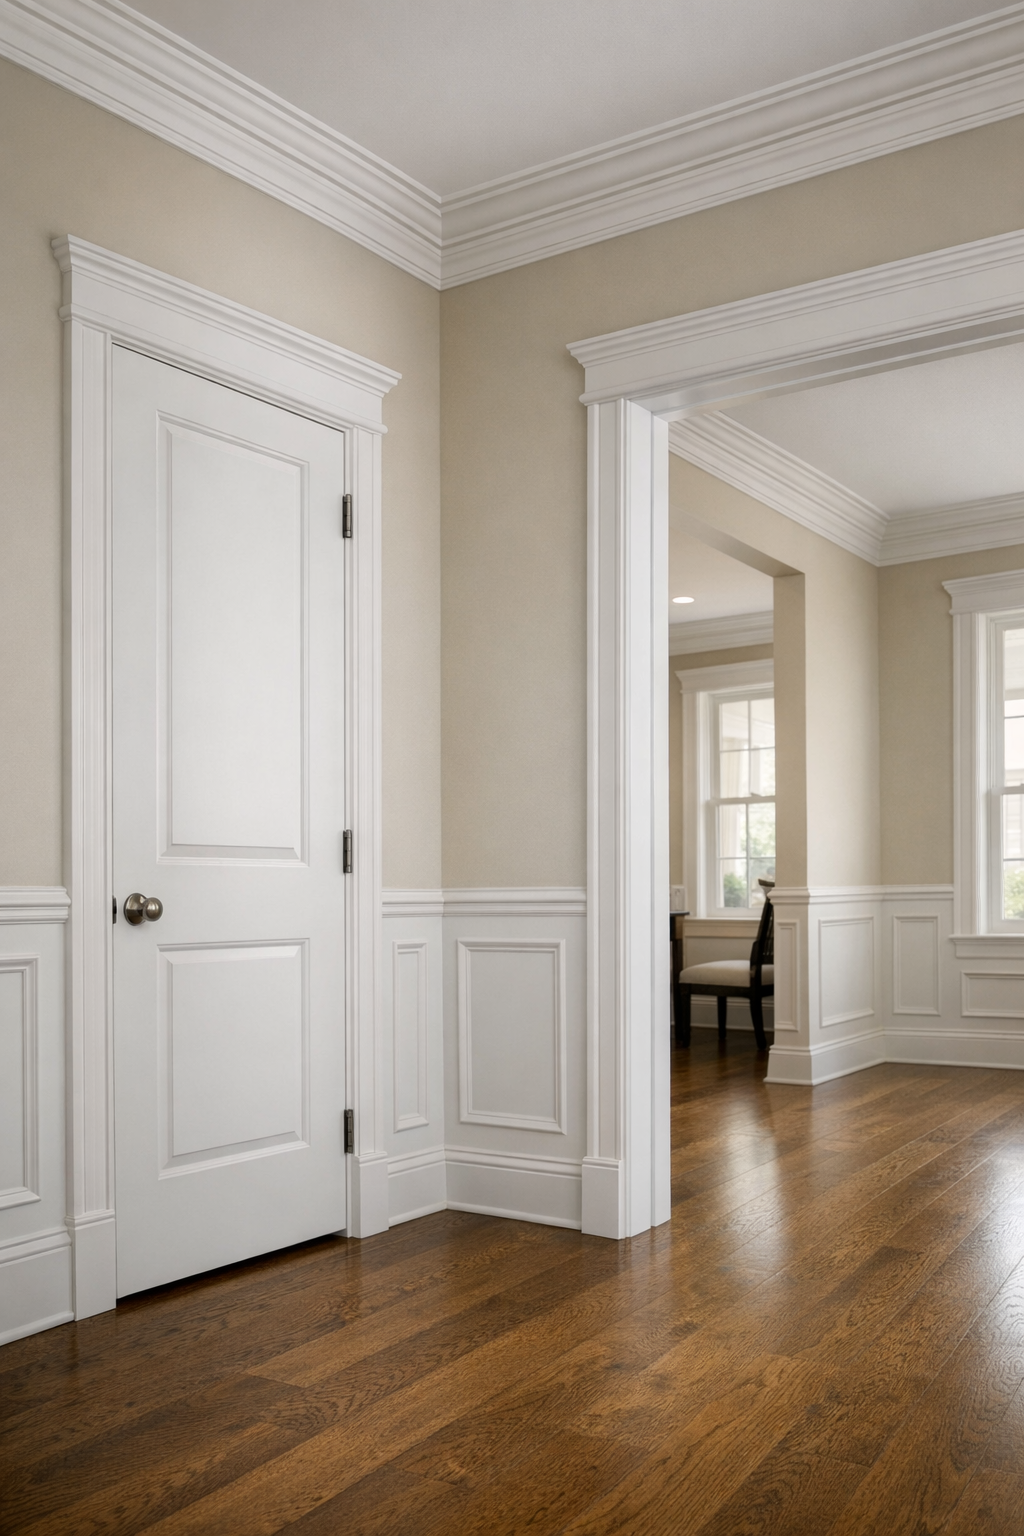
- Baseboards and casing: Baseboards cover the transition where walls meet flooring, while casing frames doors and windows. Simple profiles create a clean, modern edge; taller or more layered profiles add a more traditional or formal look. The takeaway is that these pieces should feel scaled to the room, not randomly added.
- Crown molding installation: Crown molding finishes the joint between walls and ceilings. A small crown can soften a room without drawing much attention, while larger built-up crown can make dining rooms, offices, and primary living areas feel more architectural.
- Wall paneling and custom trim work: Wainscoting, picture-frame molding, board-and-batten, and feature walls add pattern, depth, and proportion to flat wall surfaces. The layout matters as much as the profile, because spacing and alignment determine whether the wall feels balanced or busy.
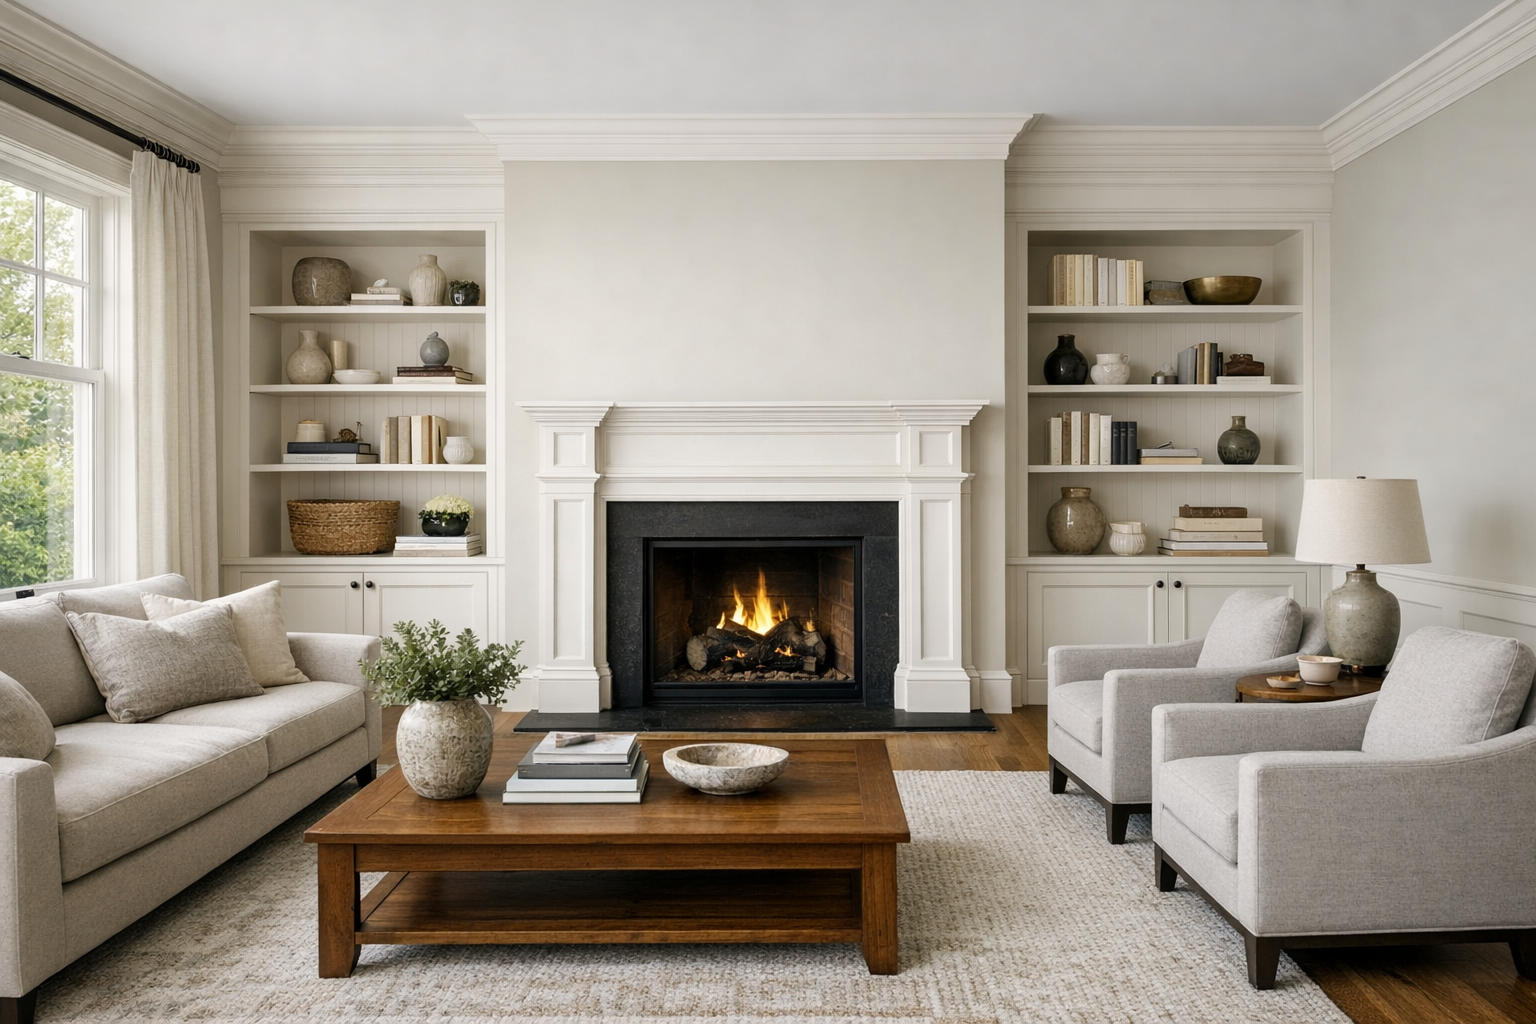
- Mantels, shelving, and built-ins: These pieces combine finish detail with function. A mantel frames a fireplace as a focal point, shelving gives display or storage space, and built-ins can make an alcove, office wall, media area, or mudroom feel planned instead of improvised.
- Stair details, doors, windows, and interior millwork: Finish carpentry can include skirt boards, newel and rail trim details, door trim, window stools, aprons, jamb extensions, and other millwork that completes the edges people see and touch every day.
This is where finish carpentry differs from rough carpentry. Rough carpentry creates the underlying frame; finish carpentry is installed after framing and drywall, so the visible fit, profile choices, proportions, and final appearance are the point of the work.
What You Can Customize
The most useful design decisions are the ones that make the new work look like it belongs in the room, not like a stock piece was squeezed into place. In custom finish carpentry, that starts with measurements, proportions, and the relationship between the woodwork, ceiling height, wall length, door openings, windows, flooring, and existing trim.
- Style, profile, and trim scale: The profile is the shape of the trim face, such as flat, eased, stepped, beveled, or more decorative. Scale is the height, width, and buildup of the pieces. Slim, simple trim reads cleaner and more modern; taller baseboards, layered casing, or larger crown molding create a more traditional or formal feel. The practical takeaway is that trim should be sized to the room instead of chosen only from a standard rack.
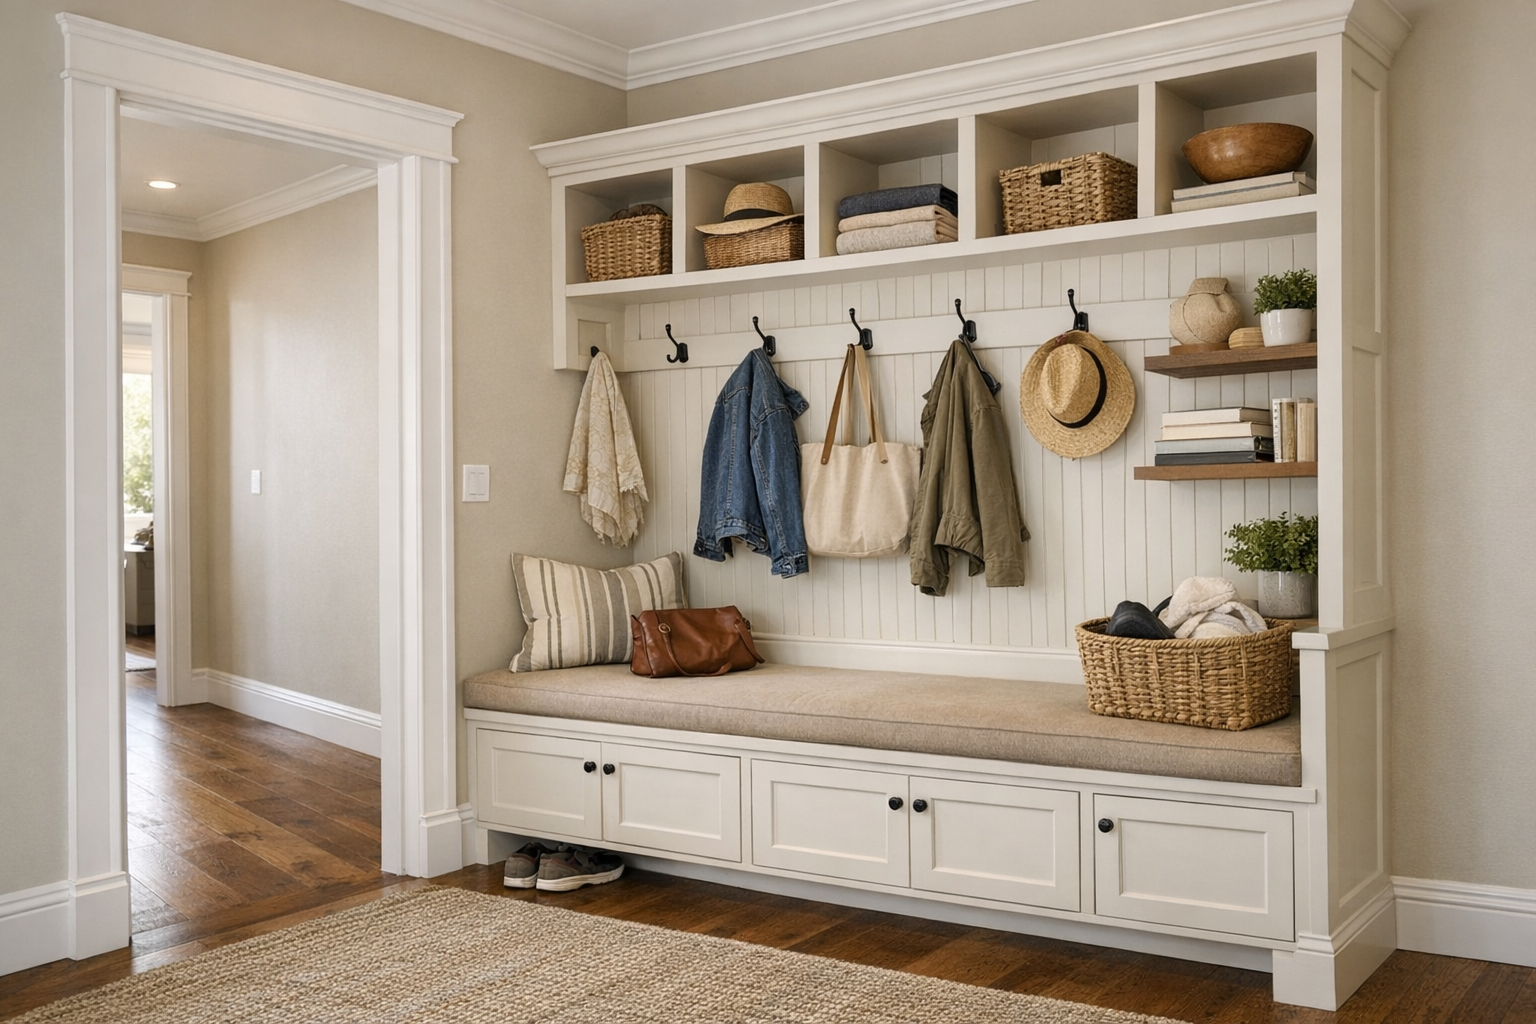
- Built-in layout and storage: Built-ins can be planned around what you actually need to store or display, whether that means closed cabinets, open shelves, media space, file storage, mudroom cubbies, or a mix. Shelf height, depth, spacing, and cabinet layout affect whether the finished piece works for books, baskets, equipment, décor, or everyday household items.
- Door and window casing details: Casing can be simple and minimal, built up with backbanding, or matched to older trim profiles. Window stools, aprons, jamb extensions, and reveal sizes all change how finished the opening looks and how well it ties into nearby baseboards or wall paneling.
- Material and finish choices: Paint-grade trim is typically selected when the goal is a smooth painted finish, while stain-grade wood is chosen when the grain and natural tone are meant to show. Wood species, finish color, sheen, and hardware all affect the final look, from quiet and seamless to warm, detailed, and furniture-like.
When new work needs to blend with existing trim, the goal is to match the profile, thickness, reveal, height, and finish as closely as the space allows. A strong match makes additions feel original to the room; a weak match usually shows up as slightly different lines, awkward transitions, or trim that looks close but not quite related.
The Details That Separate High-Quality Finish Carpentry
The real test shows up where one piece meets another. Mitered corners are angled joints used where trim turns a corner; strong work closes those joints cleanly so the line reads as one continuous profile. Weak work leaves open points, heavy filler, or corners that separate visually once paint or stain highlights the edge.
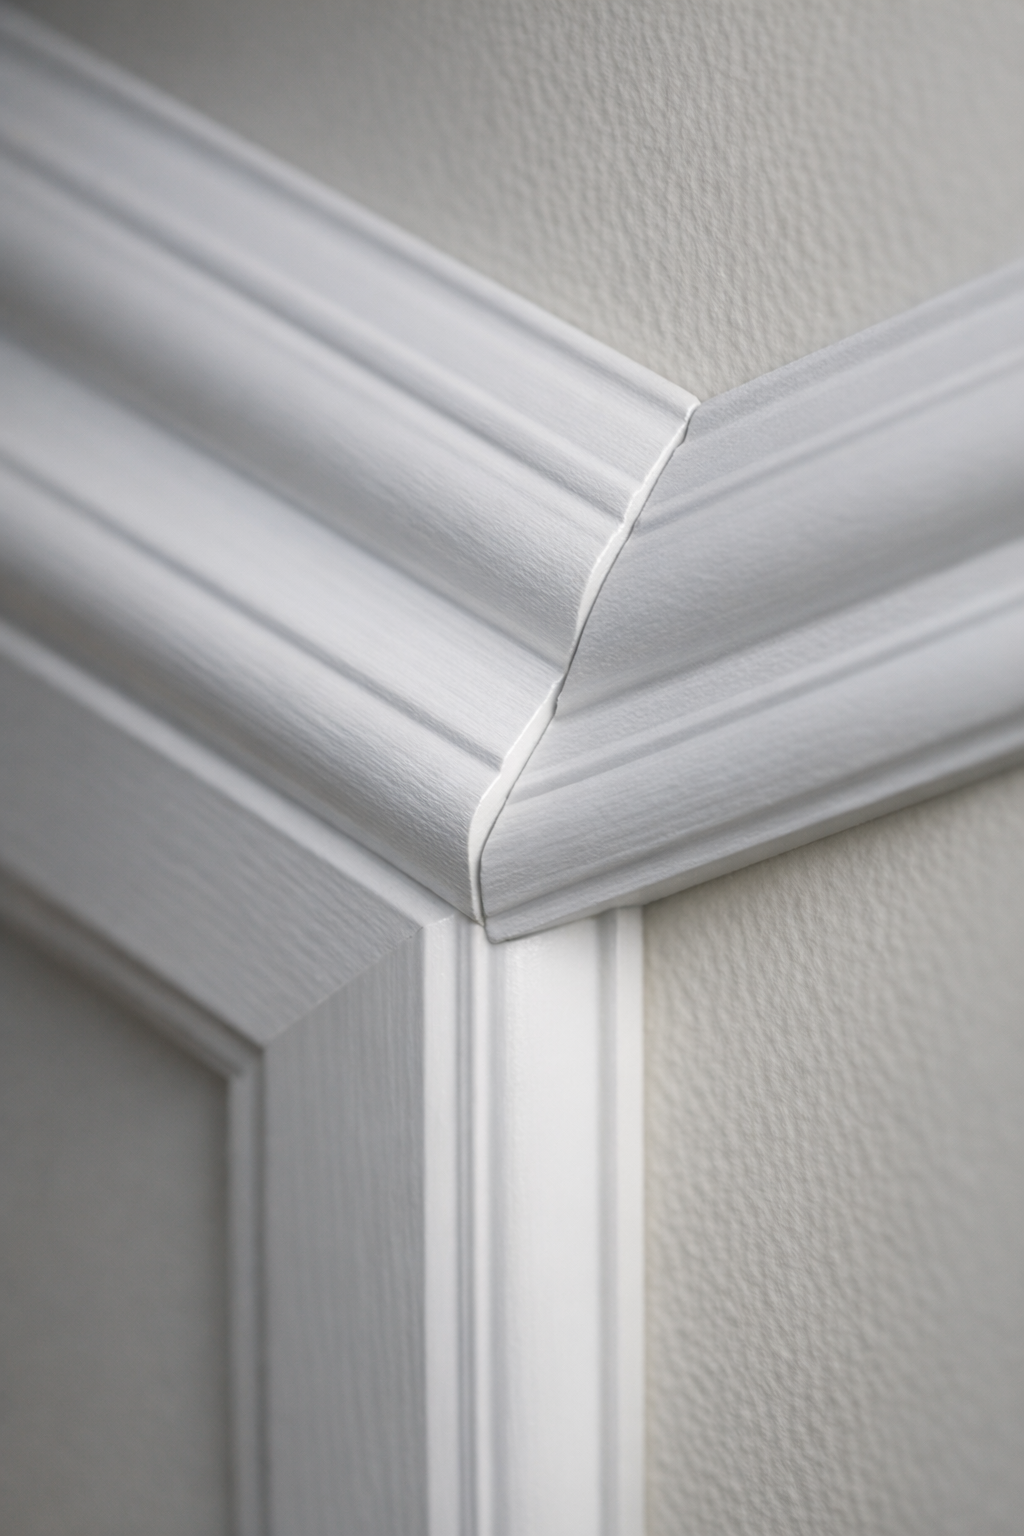
- Consistent reveals: A reveal is the small, intentional offset between pieces, often around doors, windows, panels, or cabinet faces. Even reveals make casing and built-ins look orderly; uneven reveals make the same opening look crooked even when the wall itself is the problem.
- Scribe fit: Scribing means shaping trim or built-in parts to follow an uneven wall, floor, or ceiling. A skilled finish carpenter uses it so shelving, panels, and filler pieces sit tight to real-world surfaces instead of leaving shadow gaps along wavy drywall.
- Aligned casing and clean transitions: Door casing, baseboards, crown, panel rails, and built-in edges should meet at planned heights and logical stopping points. When profiles are mismatched or trim lines die awkwardly into each other, the work can feel patched in rather than designed for the room.
- Balanced proportions: Good professional finish carpentry considers the scale of the room and nearby features. A mantel that is too bulky, shelves that look squeezed, or panels that crowd a wall can distract even if the cuts are technically neat.
- Careful finishing: Sanded seams, controlled caulking, filled nail holes, and smooth paint- or stain-ready surfaces matter because these details remain visible after the final coat. Heavy caulk, rough edges, and lumpy seams usually become more noticeable, not less.
Where Finish Carpentry Adds the Most Value
Some rooms benefit because they need storage; others benefit because the edges, openings, and focal walls need to look more resolved. That is where custom finish carpentry can make the biggest difference: in spaces where practical function and visible detail meet.
- Living rooms and dining rooms: Built-ins, mantels, crown molding, wainscoting, a chair rail, or picture frame molding can give large walls better proportion and stronger architectural detail. A chair rail divides the wall horizontally, while picture frame molding creates framed wall panels; the choice changes whether the room feels more traditional, formal, or lightly detailed.
- Offices, bedrooms, mudrooms, and kitchens: Shelving, bench seating, cubbies, trim-wrapped openings, and fitted storage help the room work harder without looking like loose furniture was added later. In kitchens and mudrooms especially, finish carpentry can also clean up transitions after remodeling where cabinets, flooring, doors, and wall surfaces meet.
- Entries and stairways: These areas shape the first impression. Newel post details, skirt boards, casing, paneling, and baseboard transitions can make high-traffic circulation areas feel more intentional instead of simply pass-through space.
- Home offices and display-style built-ins: Shelving, wall paneling, and trim details can help a focused room feel finished and cohesive while supporting everyday use.
Planning, Materials, Cost, and Timeline
A clear plan starts with the exact areas being touched, because a single trim refresh is very different from a room of built-ins, paneling, shelving, and door details. During the first conversation, it helps to identify the goal of the work, the rooms involved, what should stay, and what needs to blend with existing profiles, jambs, casing, flooring, cabinets, or wall conditions.
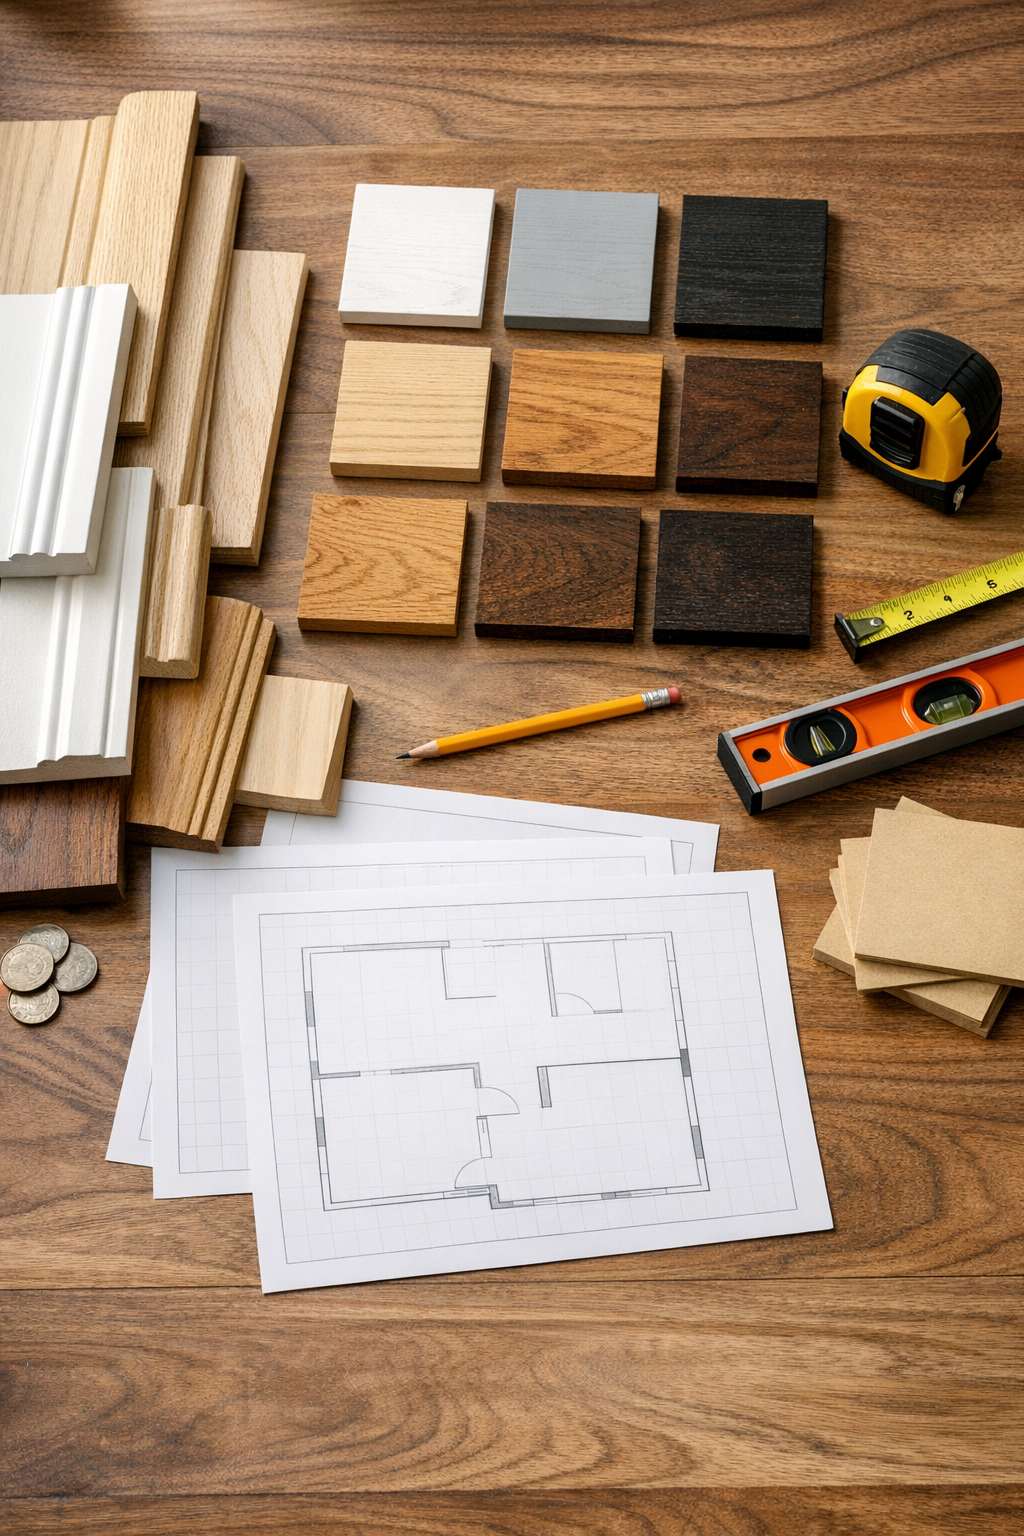
Pricing for custom finish carpentry is shaped by scope, room size, detail level, material choice, and finishing requirements. Paint-grade work is typically chosen when the final surface will be painted, so the focus is on smooth joints, crisp profiles, and clean prep. Stain-grade work exposes the wood grain, which makes species selection, color consistency, board layout, and sanding more important. Matching existing trim can also affect the estimate because the carpenter may need to source a close profile, modify stock material, or create a custom trim carpentry detail that lines up with what is already there.
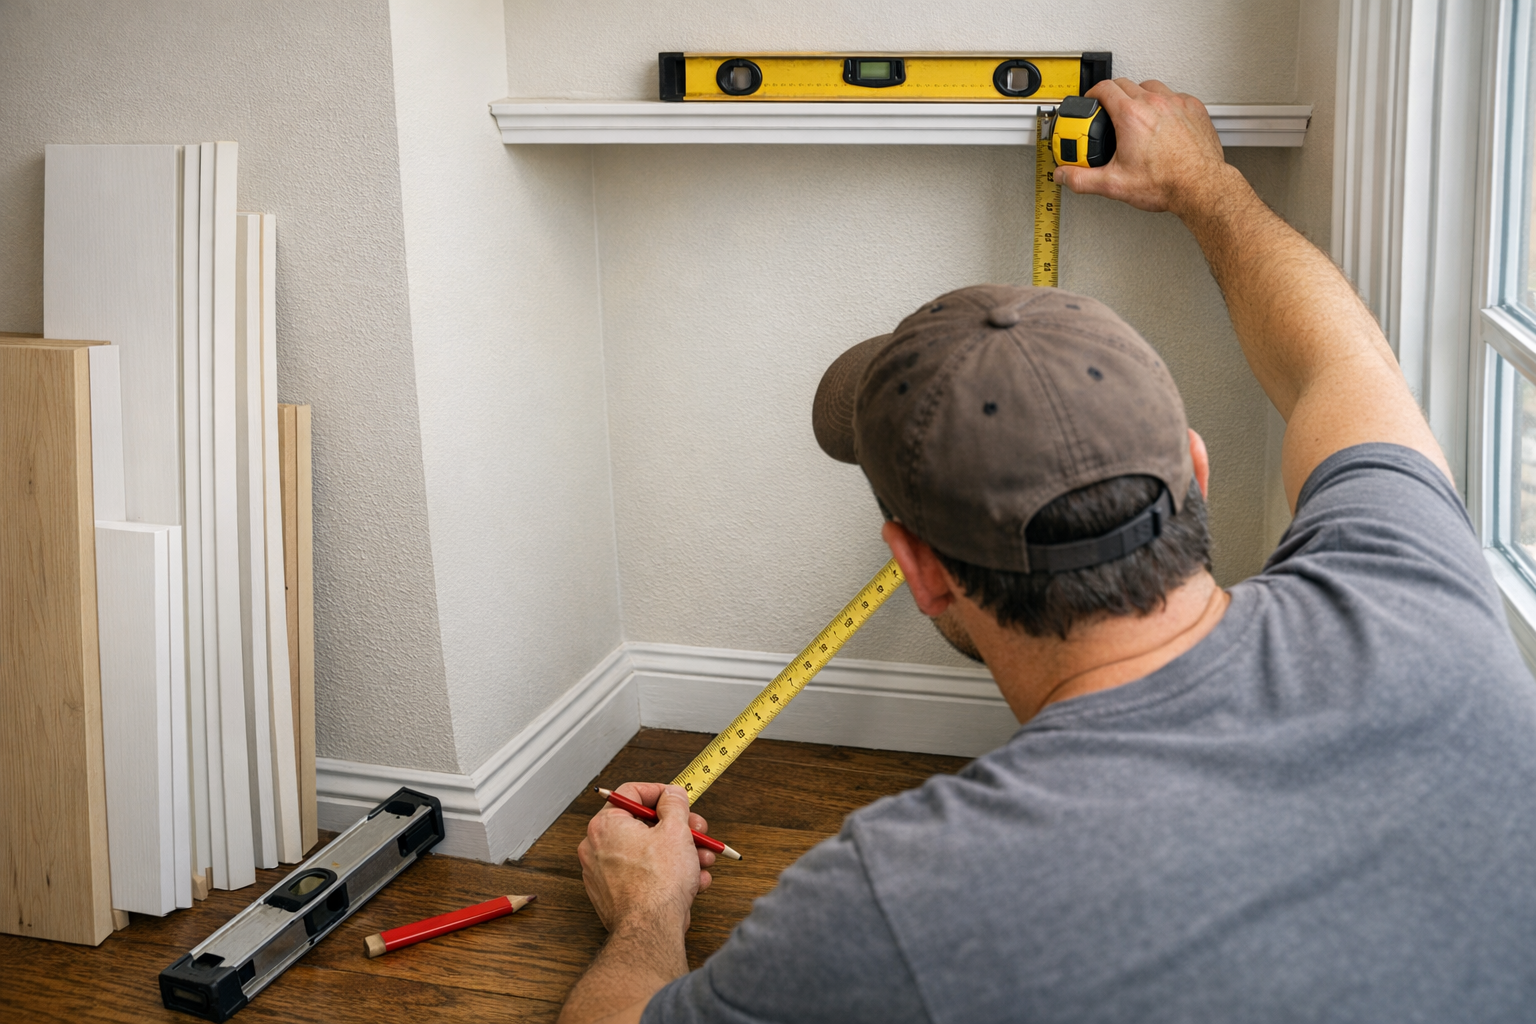
The practical workflow is straightforward: consultation, field measurements, design discussion, material selection, written estimate, scheduling, shop fabrication or site preparation, installation, and final finishing coordination. Measurements matter because walls, floors, and openings are rarely perfectly square; the estimate should reflect the real conditions of the space rather than assuming every corner and opening will behave like a drawing.
Timeline depends on how many pieces are being built, how detailed the profiles are, whether materials are readily available, and whether painting or staining happens before, during, or after installation. A good schedule leaves room for careful fitting and final touch-ups instead of rushing the details that make the work look intentional.
Request a Custom Finish Carpentry Consultation
Ready to talk through your space? Request a custom finish carpentry consultation or project review so a skilled finish carpenter can look at the details that affect the final result: fit, layout, material choice, existing profiles, storage needs, and finishing expectations.
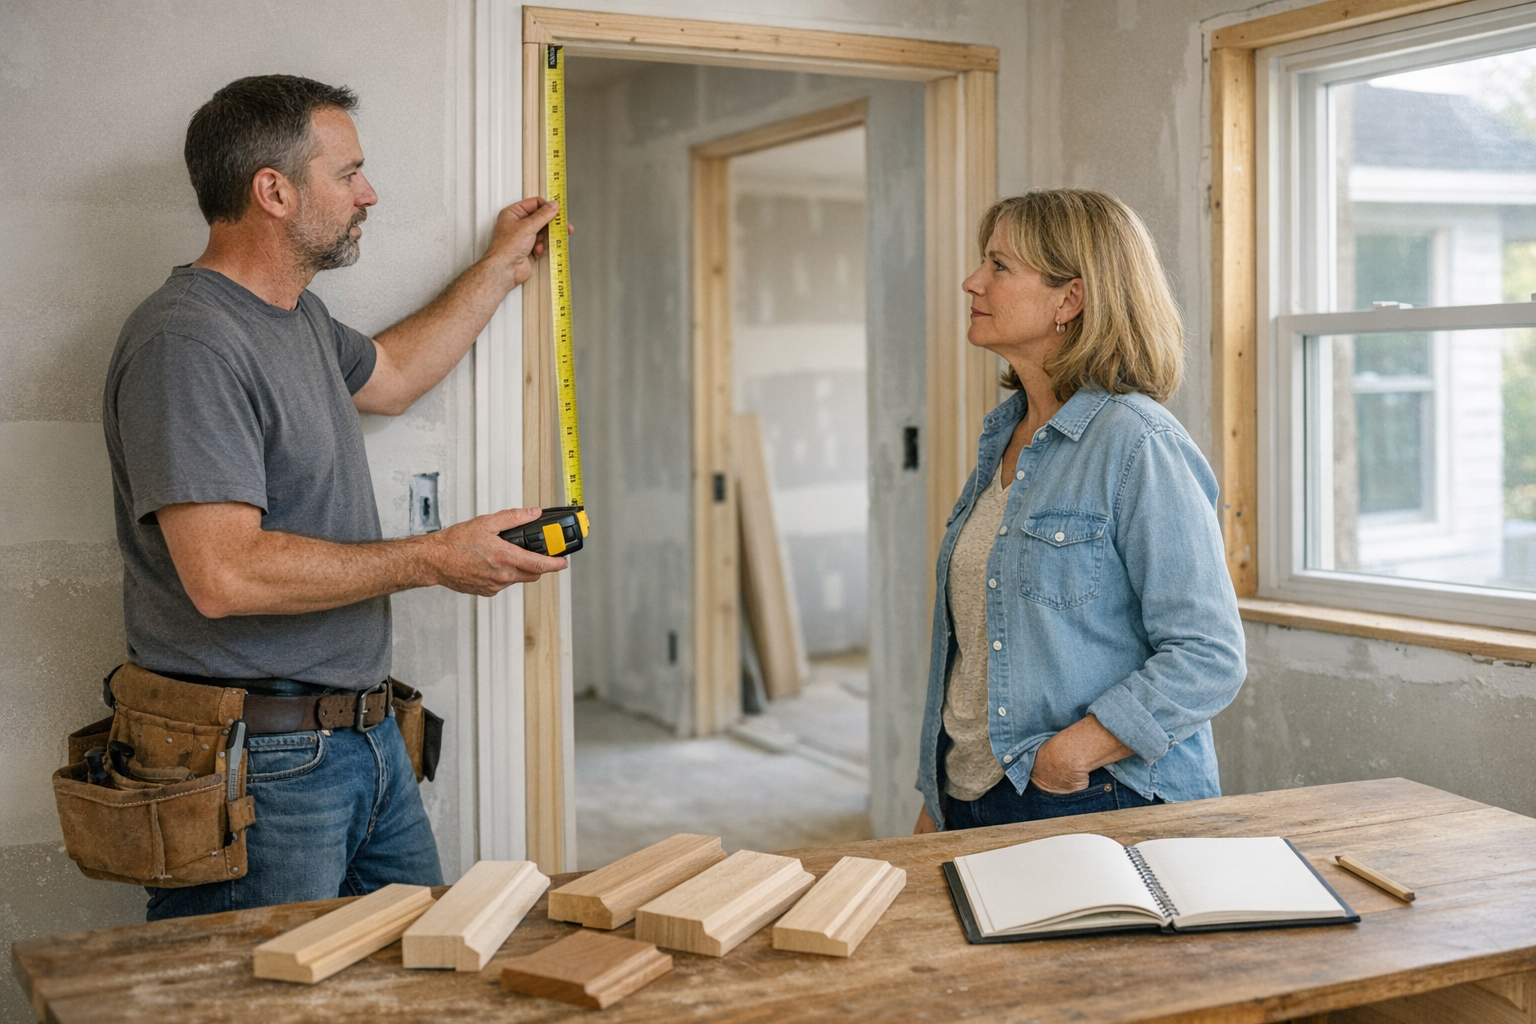
To make the first conversation productive, gather a few photos of the room, rough measurements if you have them, inspiration images, close-ups of existing trim or molding, and a short list of the rooms or features you want to improve. Rough measurements help frame the scope, while field measurements guide the final fit. From there, you can discuss options, priorities, and the next step for an estimate.
FAQs
What is included in custom finish carpentry?
Custom finish carpentry includes visible interior woodwork such as baseboards, door and window casing, crown molding, wall paneling, mantels, shelving, built-ins, stair details, doors, windows, and related millwork. It is measured and fitted after framing and drywall are complete.
What is the difference between finish carpentry and rough carpentry?
Rough carpentry creates the structural frame behind walls, floors, and openings. Finish carpentry is installed after framing and drywall, and focuses on visible details such as tight joints, consistent reveals, trim profiles, proportions, and final appearance.
Can finish carpentry be matched to existing trim?
Yes, finish carpentry can be matched to existing trim by aligning the profile, thickness, reveal, height, and finish as closely as the room allows. A strong match makes new casing, molding, paneling, or built-ins feel original to the space.
What types of wood or materials are best for finish carpentry?
Paint-grade trim is best when the final surface will be painted and the priority is smooth joints, crisp profiles, and clean prep. Stain-grade wood is best when the natural grain will show, making wood species, color consistency, board layout, and sanding more important.
How do I choose between custom built-ins and trim-only finish carpentry?
Choose custom built-ins when the space needs storage, display shelves, media space, file storage, mudroom cubbies, or a fitted alcove solution. Choose trim-only finish carpentry when the main goal is cleaner baseboards, casing, crown molding, wall paneling, or better transitions between walls, floors, doors, and windows.