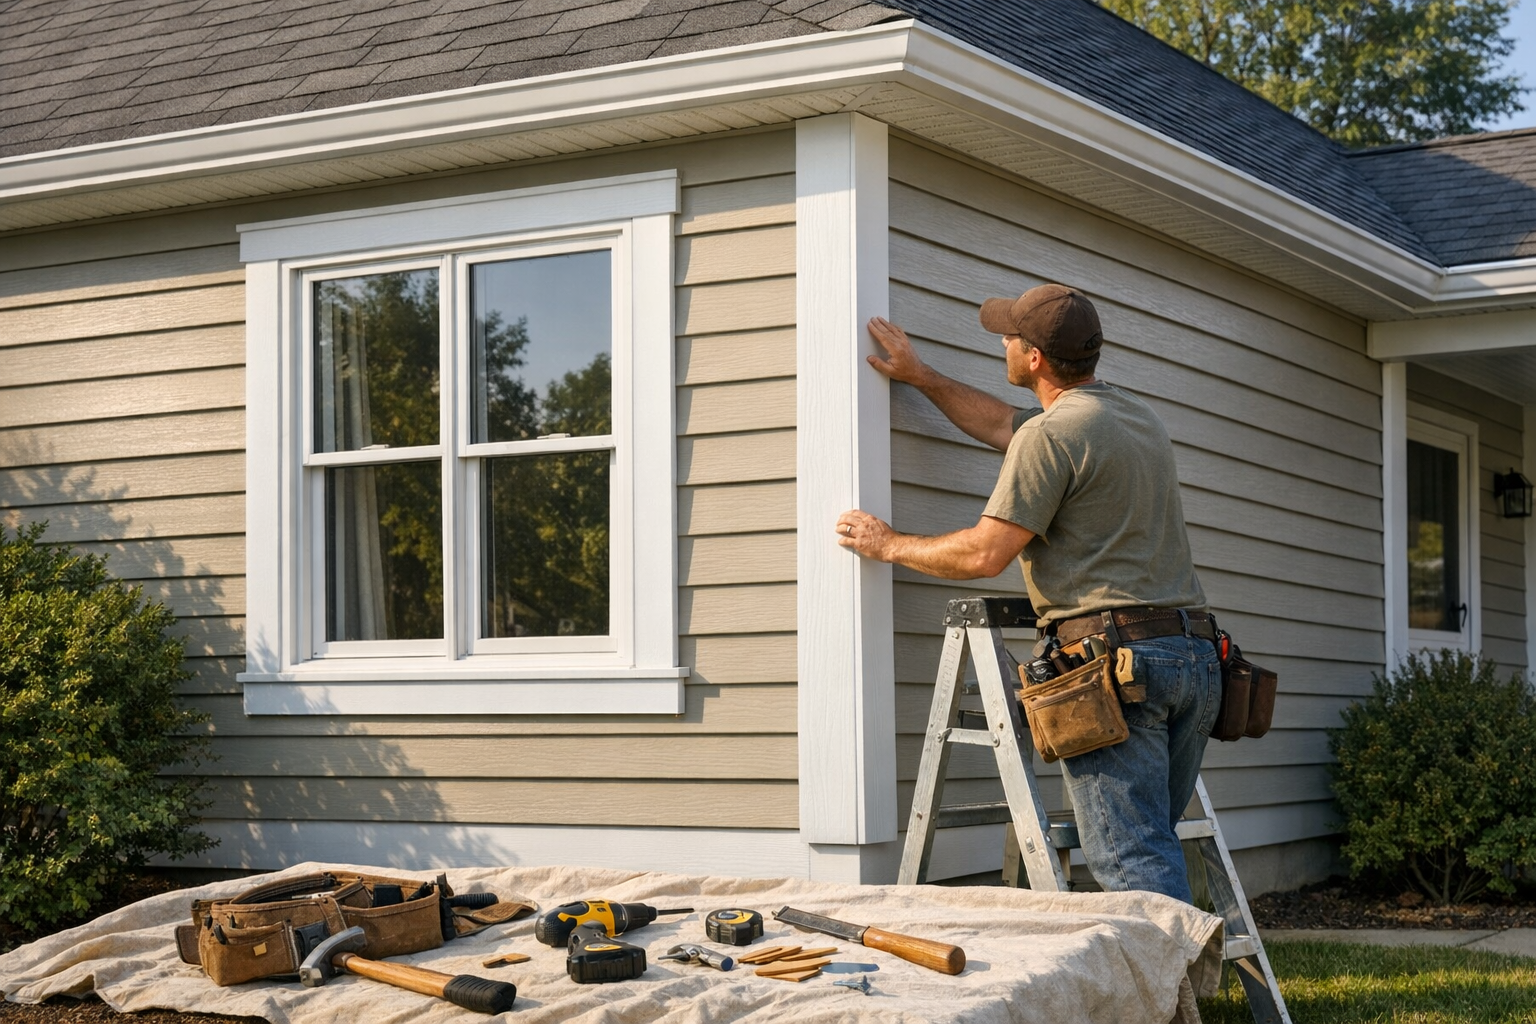
A board that feels soft under light pressure, a corner board pulling away from the siding, or trim around a window with gaps in the caulk line deserves more than a fresh coat of paint. The finished boards around roof edges, windows, doors, siding transitions, and outside corners affect curb appeal while also helping close off exposed edges where moisture can become a problem.
Good home exterior trim repair starts by looking at the full trim system, not just the most obvious bad board. A small surface crack, limited paint failure, or a loose piece of trim may be repairable when the surrounding material is still solid. Soft wood, recurring rot, swelling, splitting, water staining, or gaps that keep reopening can point to deeper moisture damage, which often makes replacement the smarter long-term choice.
Our service is built around that repair-versus-replacement decision. We inspect the damaged exterior trim, identify affected areas, explain what can be saved, and recommend replacement where the material is too compromised to hold paint, caulk, or fasteners properly. If your trim is dragging down the look of your home or raising concerns about water entry, schedule an inspection or estimate and get a clear plan for restoring it.
Signs Your Exterior Trim Needs Repair or Replacement
Start at the places that stay wet the longest: roof edges, window and door corners, lower trim boards, and joints where trim meets siding or masonry. Peeling paint, bubbling finish, small cracks, and open caulk seams can be early warning signs; they do not always mean a full replacement is needed, but they do deserve a closer look before water gets behind the surface.
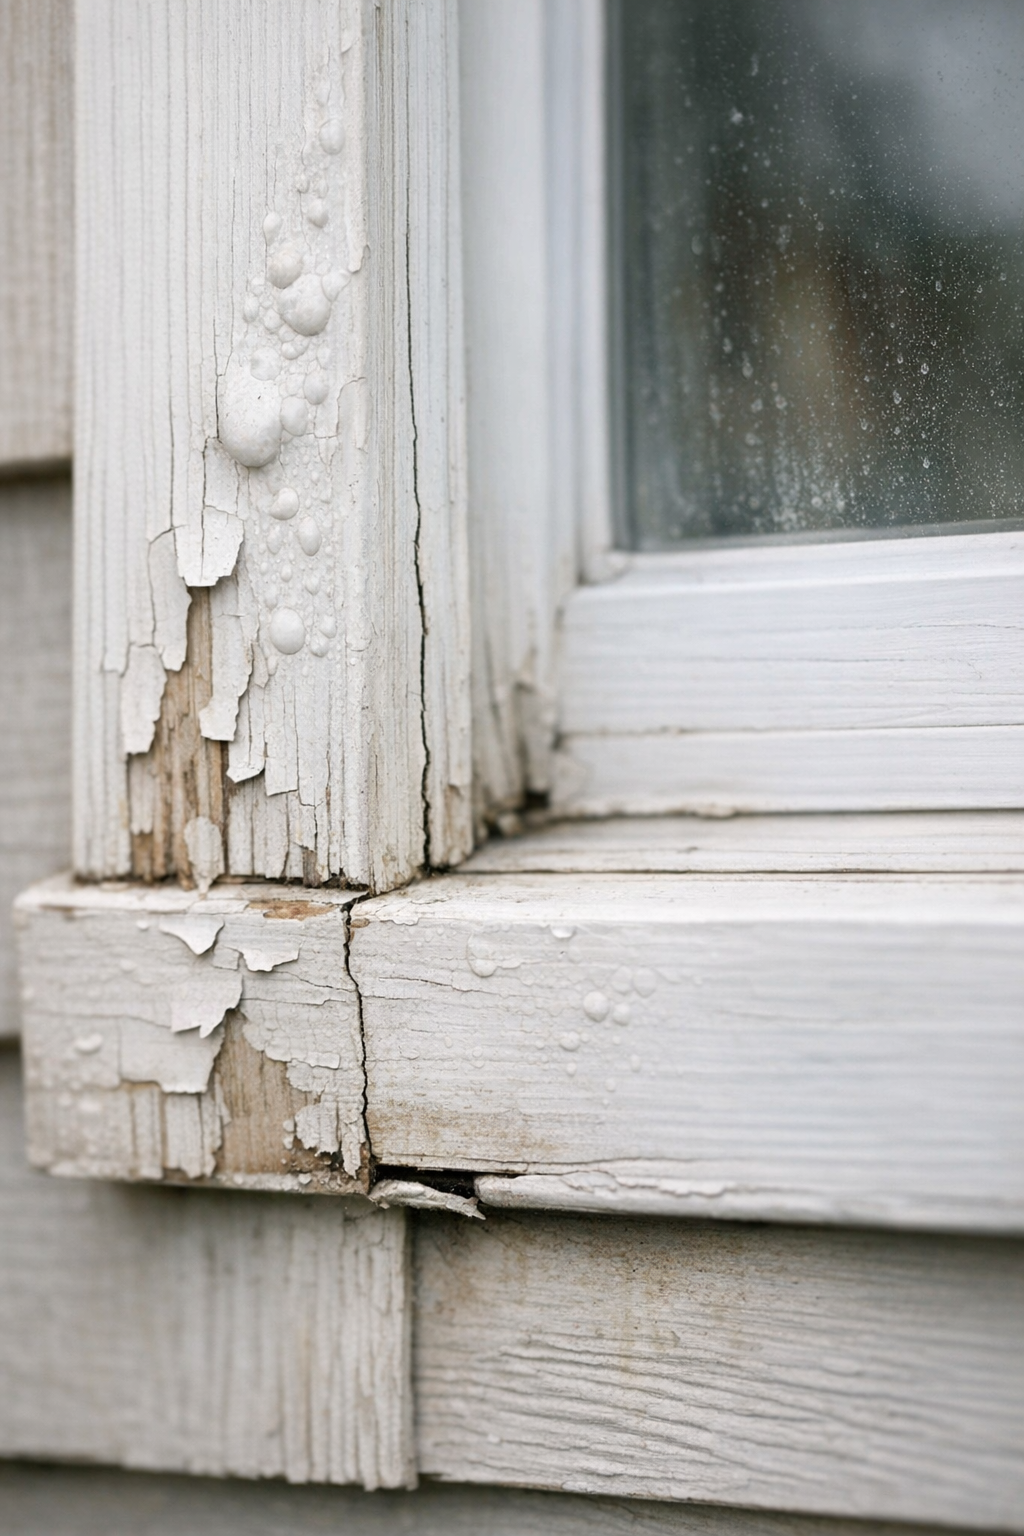
- Soft, punky, swollen, warped, or splitting boards are stronger warning signs because the trim may no longer hold paint, caulk, or fasteners well. If you can press into the wood, see the board bowing outward, or notice repeated paint failure in the same spot, repair exterior wood trim may not be enough.
- Gaps at caulk joints, loose boards, trim pulling away from siding or masonry, and water staining around windows or doors can point to moisture intrusion behind the trim, not just surface wear. These areas need evaluation as part of the full trim system.
- Pest holes, mildew growth, and recurring rot are signs that damaged trim may be creating openings or damp pockets where deterioration can keep spreading. That is when house trim repair should include looking for the moisture source, not just patching the visible face.
Some signs call for deeper investigation: sagging fascia near the roofline, repeated leaks around windows or doors, or trim damage below gutters, roof valleys, or other drainage paths. Those patterns can indicate a water-management problem feeding the trim damage, so the best next step is a professional inspection that separates cosmetic repairs from areas where replacement will better stop recurring moisture intrusion.
When Trim Repair Is Enough, and When Replacement Is the Smarter Choice
The real question is whether the damaged area can still perform like trim after it is repaired. A good exterior trim repair candidate is a small, contained problem: a hairline crack, a minor split, a loose fastener, a short failed caulk joint, or isolated paint failure where the surrounding board is still firm and dry enough to hold finish and sealant.
- Repair is usually the cost-effective choice when the damage is shallow and localized. For example, a small split at the end of a board may be stabilized and refinished if the rest of the trim is sound, while a loose section may only need proper fastening and sealing if moisture has not damaged the board behind it.
- Exterior trim replacement is usually smarter when rot is widespread, the board feels soft through its depth, the same spot keeps failing, or the trim is warped, severely split, pest-damaged, or no longer able to hold paint or caulk. In those cases, patching the face may leave the underlying problem in place.
- The surrounding material matters as much as the obvious bad spot. If nearby boards, fasteners, joints, or the area behind the trim show signs of hidden moisture or poor flashing, a professional may recommend replacing more than the visibly damaged piece so the repair does not fail again quickly.
That is why wood rot repair is not just about filling a soft area and painting over it. The inspection should test the board's firmness, look at the back edges and joints where possible, and judge whether the trim can still protect the opening or edge it was meant to cover.
The practical takeaway is simple: repair saves money when the trim is mostly healthy; replacement protects the home better when the material has lost strength, shape, or the ability to stay sealed. A professional recommendation should balance appearance, durability, and the risk of repeat damage.
Exterior Trim Areas We Repair and Replace
A thorough exterior trim repair and replacement visit looks at each outside trim area by the job it performs, because roof-edge boards, wall corners, and opening trim tend to fail in different ways. This service focuses on exterior building trim, not interior molding, baseboards, cabinetry, or crown molding.
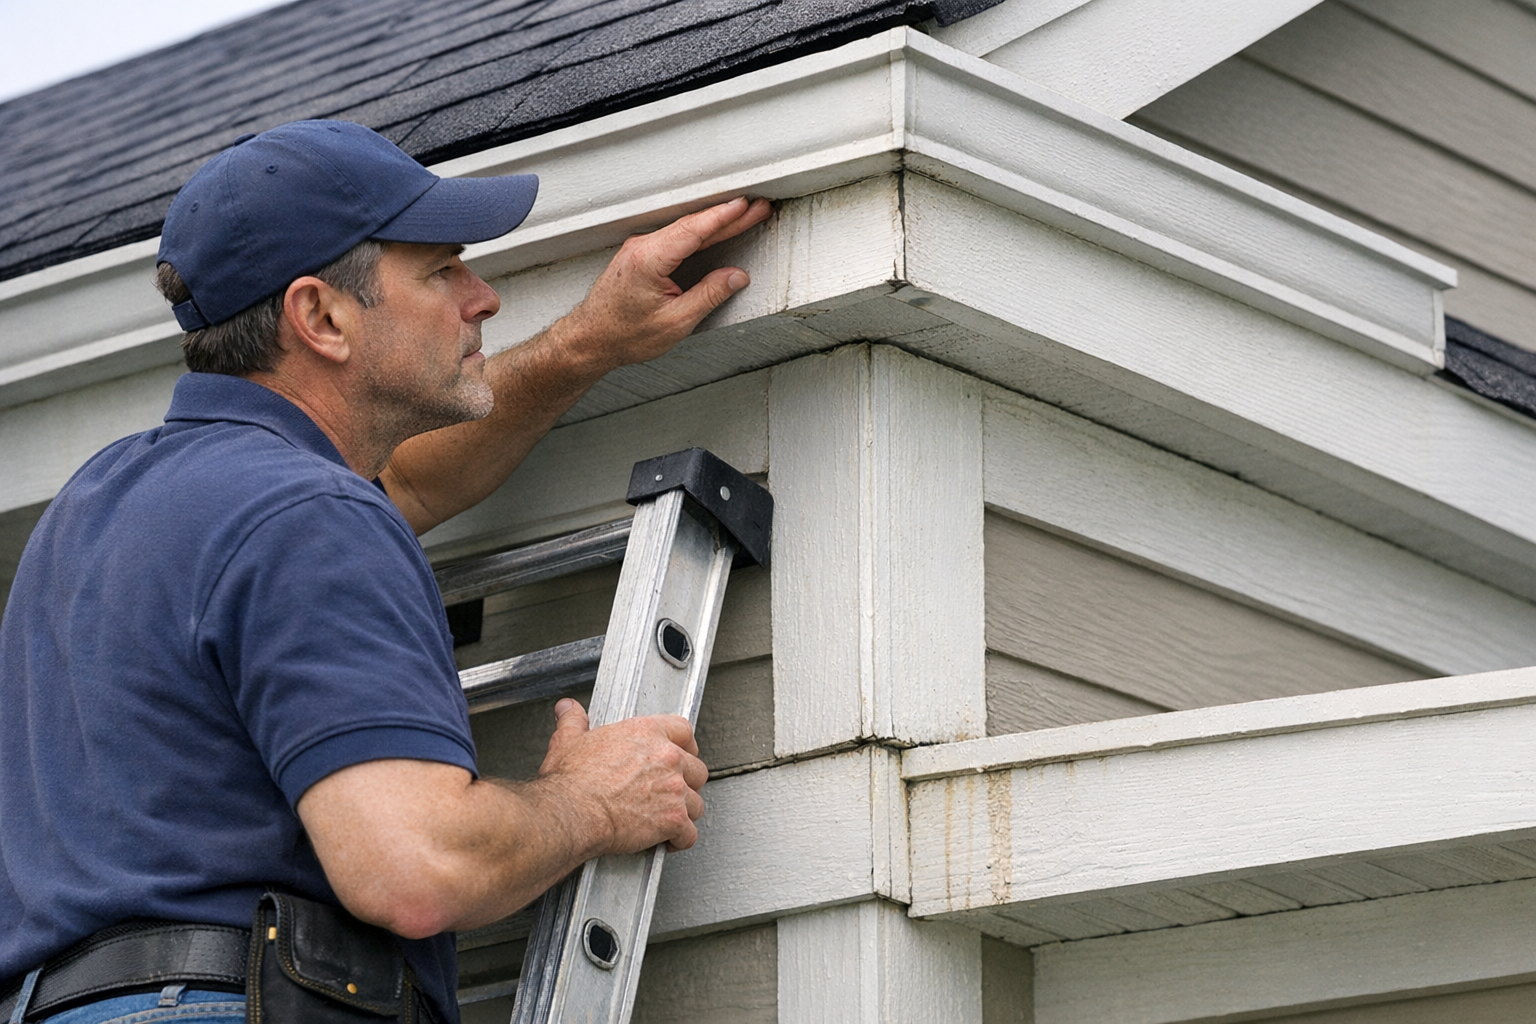
- Fascia boards run along the roof edge behind or near the gutter line. Fascia board repair often involves checking for peeling paint, soft spots, sagging sections, and repeated failure where water from the roof edge or gutters has kept the board wet.
- Soffits are the underside pieces beneath roof overhangs. Soffit repair may be needed when panels are loose, stained, warped, cracked, or damaged near vents and eaves where moisture can collect.
- Rake boards follow the sloped edge of a gable roof. Because they sit at an exposed roofline, splits, open joints, failed paint, and loose sections can show up where wind and rain hit the edge of the house.
- Frieze boards sit high on the wall where siding meets the soffit or roof overhang. Damage here can include gaps, failing caulk, paint breakdown, or rot where water gets trapped at the upper siding transition.
- Corner boards protect and finish the outside corners where siding planes meet. They are common trouble spots for splashback, impact damage, open seams, swelling, and lower-end rot.
- Window casing and door casing frame exterior openings. Window trim replacement or door trim replacement may be the better choice when caulk joints have failed, boards are swollen, corners are soft, or water staining keeps returning around the opening.
- Siding transitions are the trim pieces where siding changes direction, meets another material, or stops at an edge. Failed sealant, gaps, impact marks, and trapped moisture can make these areas look rough and allow damage to spread into nearby trim.
Exterior Trim Material Options: Wood, PVC, and Composite
Material choice is where the repair plan becomes personal: the right board for a front window surround may not be the right board for a wet fascia run or a lower corner that keeps taking splashback. A good exterior trim carpentry recommendation weighs the condition of the surrounding trim, the exposure level, the profile you are trying to match, and whether the goal is a spot repair, a blended replacement, or a more durable upgrade.
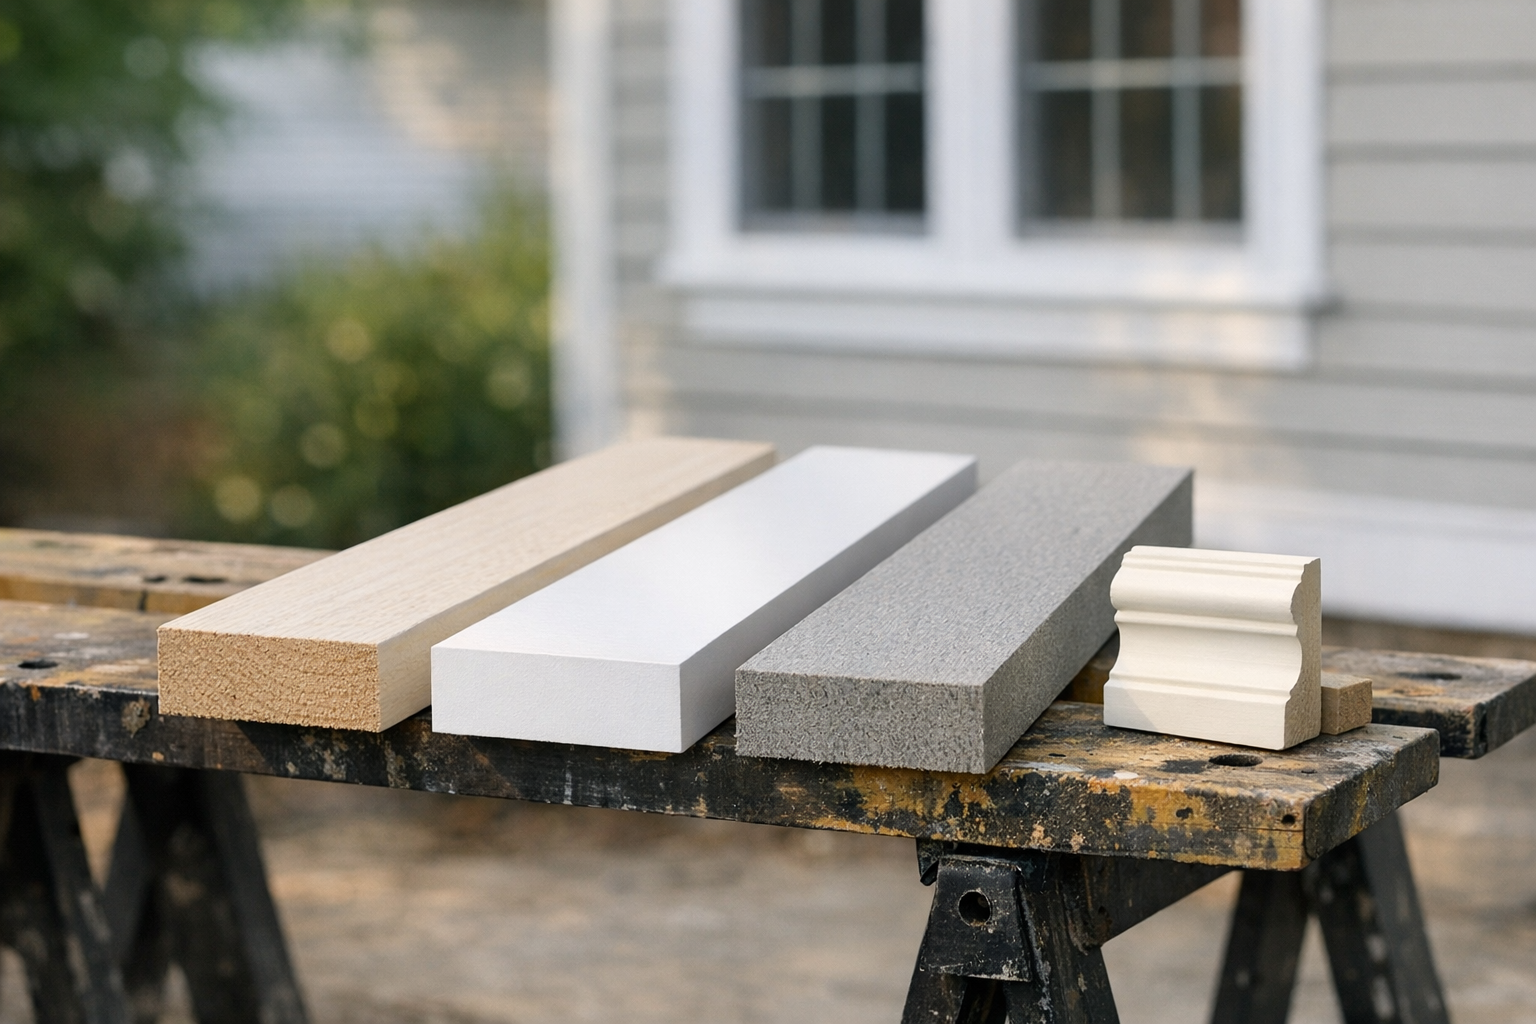
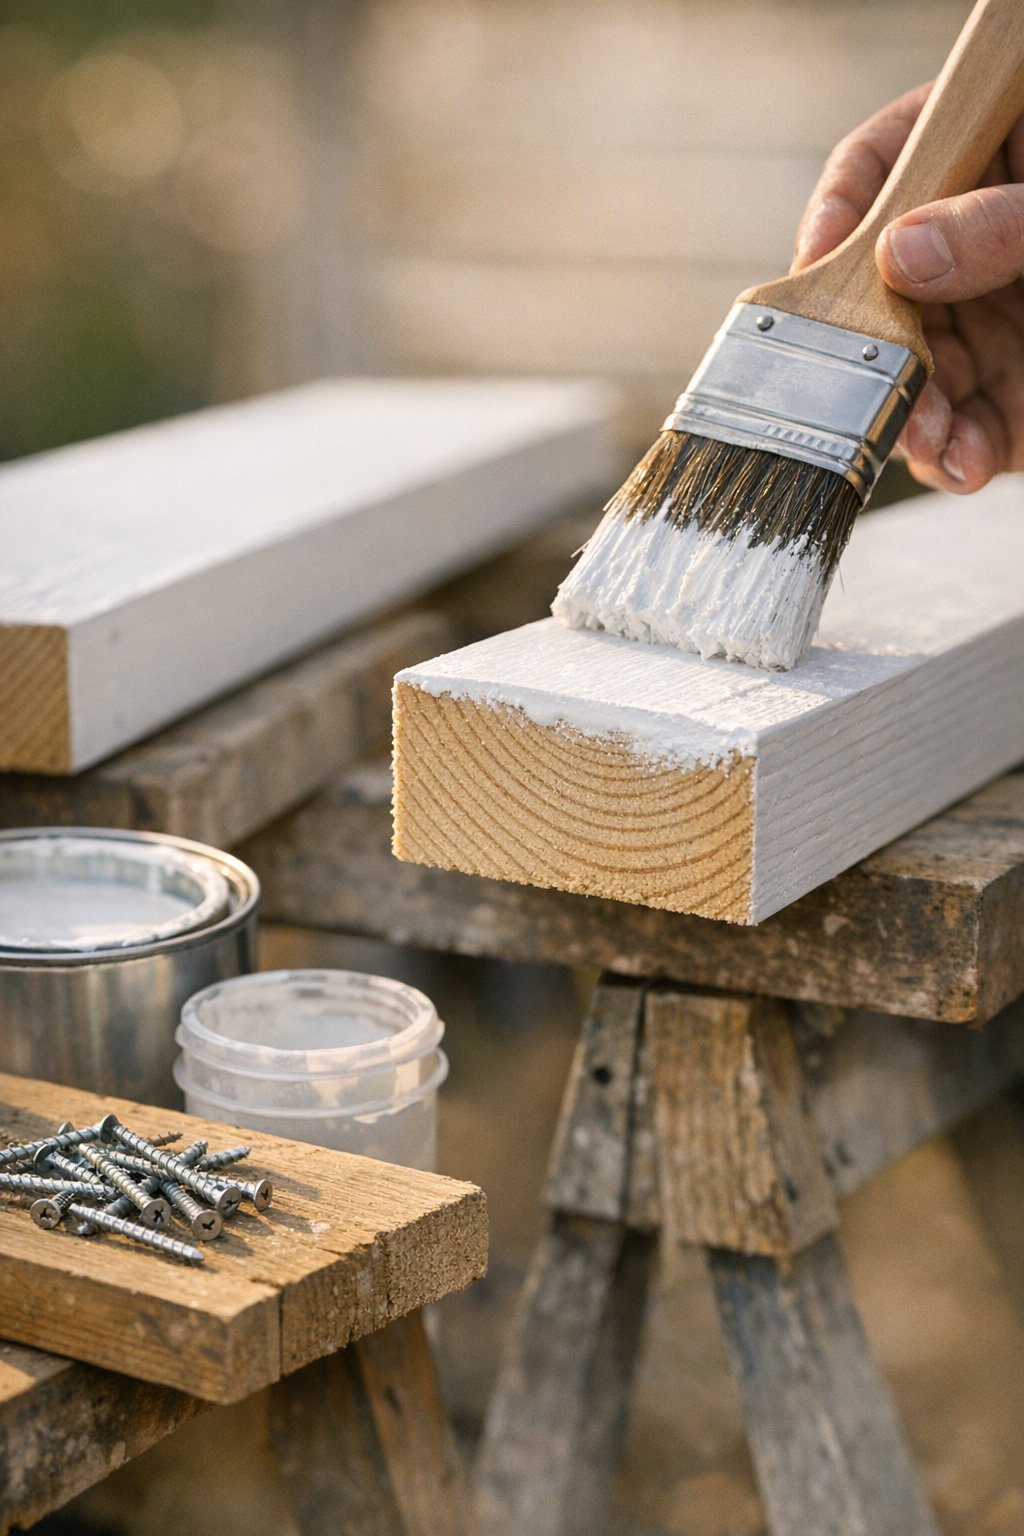
- Wood trim is often chosen when the home has traditional details, shaped profiles, or existing boards that need to be matched closely. It cuts, sands, and paints well, which makes it useful for visible window trim, door trim, corner boards, and older exterior details. The tradeoff is maintenance: wood needs careful priming, sealed cut ends, sound paint, and upkeep over time, especially where past softness, splitting, or recurring moisture damage has already shown up.
- PVC trim replacement is commonly considered for moisture-prone locations because it is designed as an exterior trim material rather than natural wood. It can be a practical choice for areas where repeated paint failure, swelling, or rot has made another wood board a weak investment. The tradeoff is that PVC has its own installation and appearance considerations, including movement with temperature changes, fastener placement, joint planning, and whether its smoother look fits the rest of the home.
- Composite trim is another replacement option that can balance a painted-trim appearance with improved resistance to decay compared with damaged wood. Product lines vary in density, texture, approved fasteners, finishing requirements, and available profiles, so composite trim is best evaluated against the exact location and the surrounding boards it needs to meet.
The practical takeaway: there is no single best material for every exterior trim repair and replacement project. Budget, weather exposure, the shape of the existing trim, desired curb appeal, and long-term maintenance expectations all matter. Sometimes the cleanest result is matching the original wood detail; sometimes the smarter move is upgrading a high-exposure section while keeping the rest of the trim visually consistent.
What to Expect From Our Exterior Trim Service
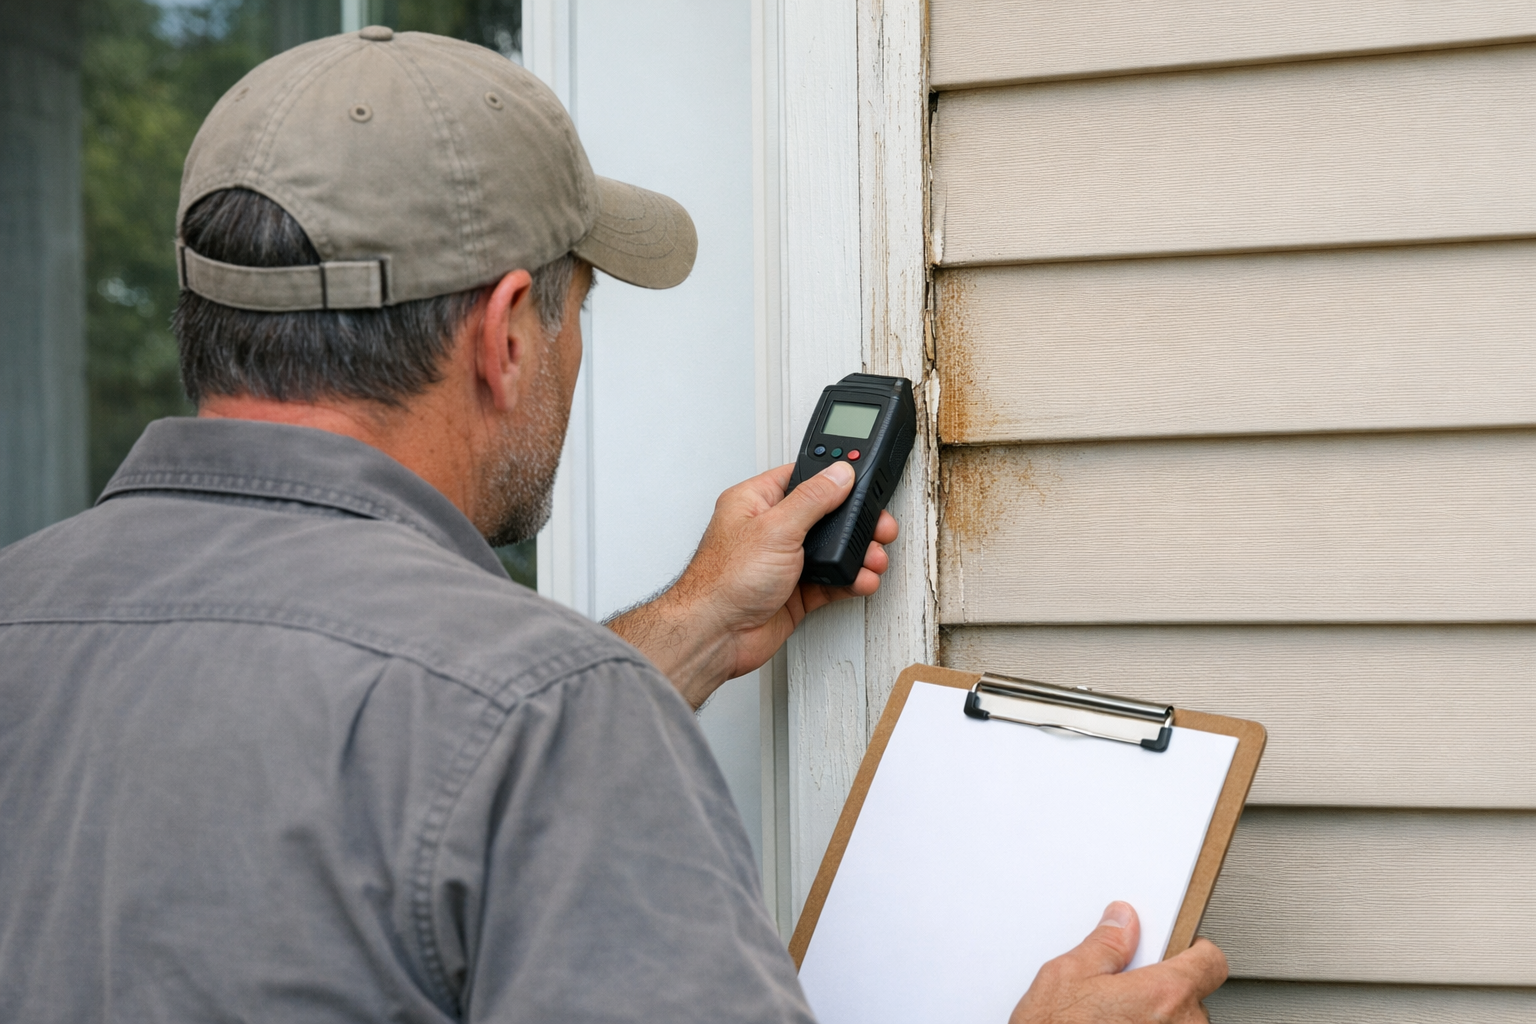
At the first visit, we map the visible damage against nearby seams, roof edges, and openings so the recommendation is tied to the cause, not just the bad-looking board. The inspection covers the affected boards and nearby trim, then looks for moisture patterns, open caulk joints, staining, swollen edges, loose fasteners, and other clues that help separate a surface repair from a board that needs to come out.
- Inspection and diagnosis: We review the damaged area, the surrounding trim, and likely moisture sources. A small crack in firm material may point toward repair, while soft wood, recurring rot, warping, or damage near roof runoff can make replacement the better recommendation.
- Caulk and flashing review: Caulk joints are the sealed seams where trim meets siding, windows, doors, or adjacent boards; failed caulk can let water reach edges and end cuts. Flashing is the water-shedding detail that helps direct water away from openings and transitions, so a concern there may need to be addressed as part of the larger repair plan rather than covered with new trim alone.
- Clear recommendation: We explain which areas can be repaired, which should be replaced, and whether matching the existing profile or upgrading the material makes the most sense for that location.
- Removal and exterior trim carpentry: When replacement is needed, failed material is removed carefully, the exposed area is evaluated, and carpentry repairs are made before matched or upgraded trim is installed.
- Sealing, finishing, and cleanup: Joints are sealed, trim is primed or painted as appropriate for the project, and the work area is cleaned before a final review of the completed repair.
Project timing is discussed around the actual scope: the number of trim areas, severity of damage, material availability, weather, paint or primer drying time, and whether hidden damage is discovered after removal can all affect the schedule.
How Proper Installation Helps Prevent Repeat Trim Damage
The difference between a short-term patch and a lasting trim repair often comes down to the details you do not notice from the curb. Proper fastening keeps boards tight without forcing them out of line; back-priming, when the material and project call for it, means coating the hidden side before installation; and sealed end cuts help protect the exposed board ends that tend to absorb moisture first.
Finishing matters, too. Exterior caulk or sealant is used at joints that need a flexible weather-resistant seal, while the paint system includes the primer and finish coats selected for the trim material. A weak signal is a neat-looking bead over a dirty, moving, or already-soft joint; a stronger repair leaves firm material, clean seams, sealed edges, and a finish that can bond properly.
Good exterior trim repair and replacement also looks beyond the board itself. If gutter runoff, poor drainage, moisture intrusion near an opening, or a flashing problem keeps feeding water into the same area, new trim can suffer repeat rot or early paint failure. That is why professional workmanship includes watching how water reaches the trim, not just making the damaged piece look new again.
Schedule an Exterior Trim Inspection or Estimate
Before you approve another patch or repaint, schedule an exterior trim inspection so the recommendation is based on the whole condition of the trim area. A professional estimate for damaged exterior trim repair can weigh where the problem is located, how far the damage has spread, whether the board is still firm, what material makes sense, what finish work is needed, and whether moisture stains, recurring rot, gaps, or nearby structural warning signs point toward exterior trim replacement.
That evaluation helps separate a small repair from a smarter replacement investment without guessing from curb-level appearance alone. If your fascia, soffit, corner boards, window trim, door trim, or other exterior details are rotted, loose, cracked, warped, or simply outdated, request an exterior trim repair and replacement estimate today and get a clear plan for the next step.
FAQs
How do I know if exterior trim needs repair or replacement?
Exterior trim needs attention when you see peeling paint, bubbling finish, cracks, open caulk seams, soft boards, swelling, warping, splitting, loose trim, or water staining around windows and doors. Soft wood, recurring rot, and gaps that keep reopening often point to replacement rather than a surface repair.
What causes exterior trim to rot?
Exterior trim often rots when moisture stays around roof edges, window and door corners, lower boards, caulk joints, gutters, roof valleys, or siding transitions. Failed caulk, poor flashing, gutter runoff, trapped moisture, and unsealed end cuts can let water reach the trim and cause repeat damage.
What exterior trim areas can be repaired or replaced?
Common exterior trim repair areas include fascia boards, soffits, rake boards, frieze boards, corner boards, window casing, door casing, and siding transition trim. Fascia boards run along the roof edge near gutters, soffits sit under roof overhangs, and rake boards follow the sloped edge of a gable roof.
What is the best material for replacing exterior trim?
Wood is best when matching traditional profiles and visible details matters, but it needs priming, sealed cut ends, paint, and ongoing upkeep. PVC is practical for moisture prone areas with recurring swelling, rot, or paint failure, while composite trim can offer a painted look with better decay resistance than damaged wood.
When is exterior trim repair enough instead of replacement?
Repair is usually enough for a small, contained issue such as a hairline crack, minor split, loose fastener, short failed caulk joint, or isolated paint failure when the surrounding board is firm and dry. Replacement is smarter when rot is widespread, the board is soft through its depth, damage keeps returning, or the trim is warped, severely split, pest damaged, or unable to hold paint or caulk.