If a room looks almost finished but still has rough edges where the walls meet the floor, professional baseboard installation is the detail that brings it together. Baseboards cover that wall-to-floor joint, help protect the lower wall edge from everyday scuffs, and create a cleaner transition between flooring, paint, and finished wall surfaces.
This service is a good fit after new flooring, interior painting, room remodeling, or property turnover when old trim is missing, damaged, outdated, or no longer sits cleanly against the surface around it. Bedrooms, hallways, living areas, offices, rental units, and remodeled spaces all benefit from trim that looks intentional instead of patched in after the fact.
This page is written for homeowners who want to request an estimate or plan a baseboard installation service, not for readers looking for a step-by-step DIY tutorial. A professional visit helps define the actual scope, including measuring, fitting, fastening, and finishing needs, so you can understand what the project requires before work is scheduled.
What Our Baseboard Installation Service Includes
A typical visit starts by defining the run of trim: which rooms, which walls, how many corners and door openings, and whether the existing baseboards stay, get removed, or need selective replacement. That planning matters because baseboard trim installation is not just "putting up boards"; the material, wall condition, floor height, and desired painted or stained finish all affect the work included.
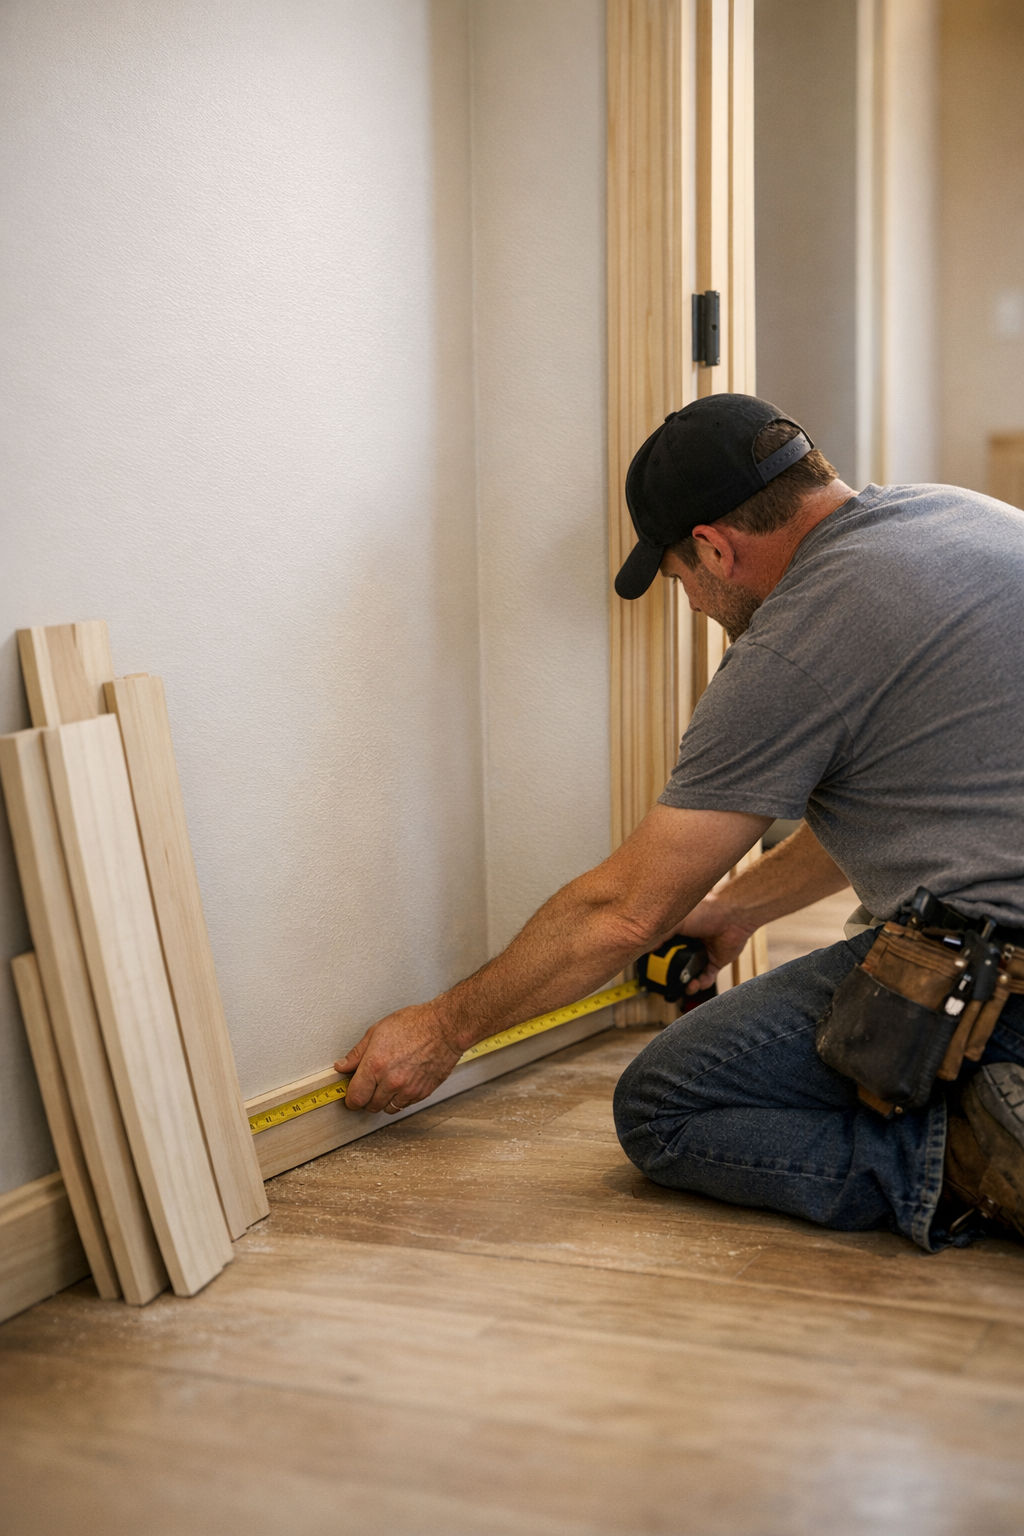
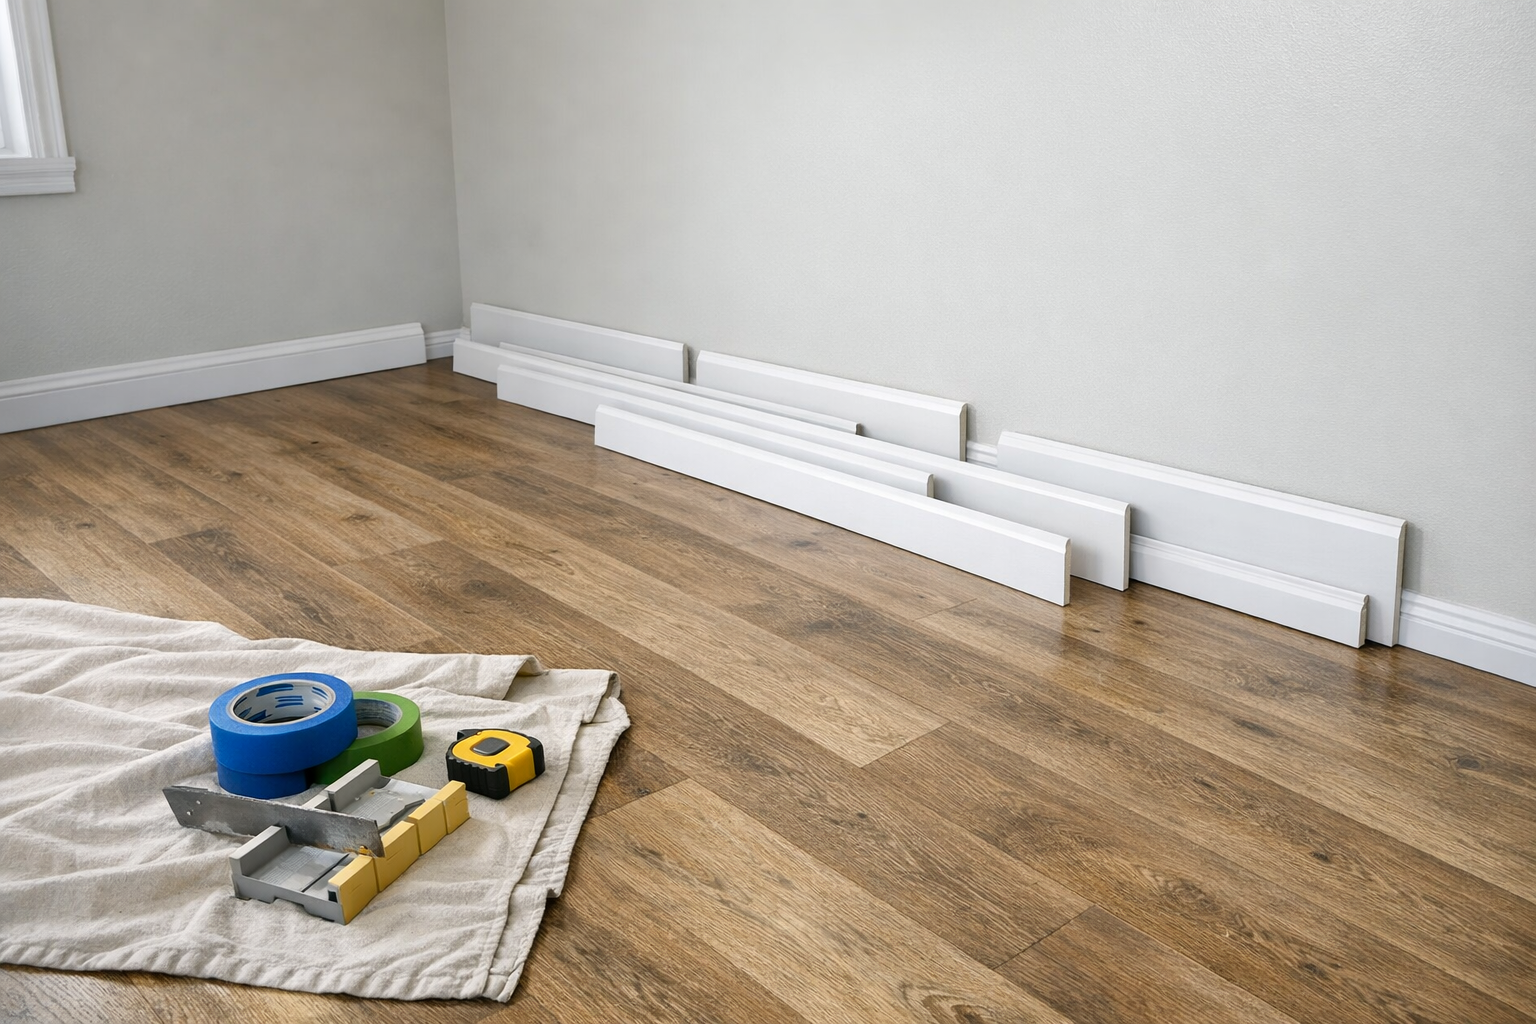
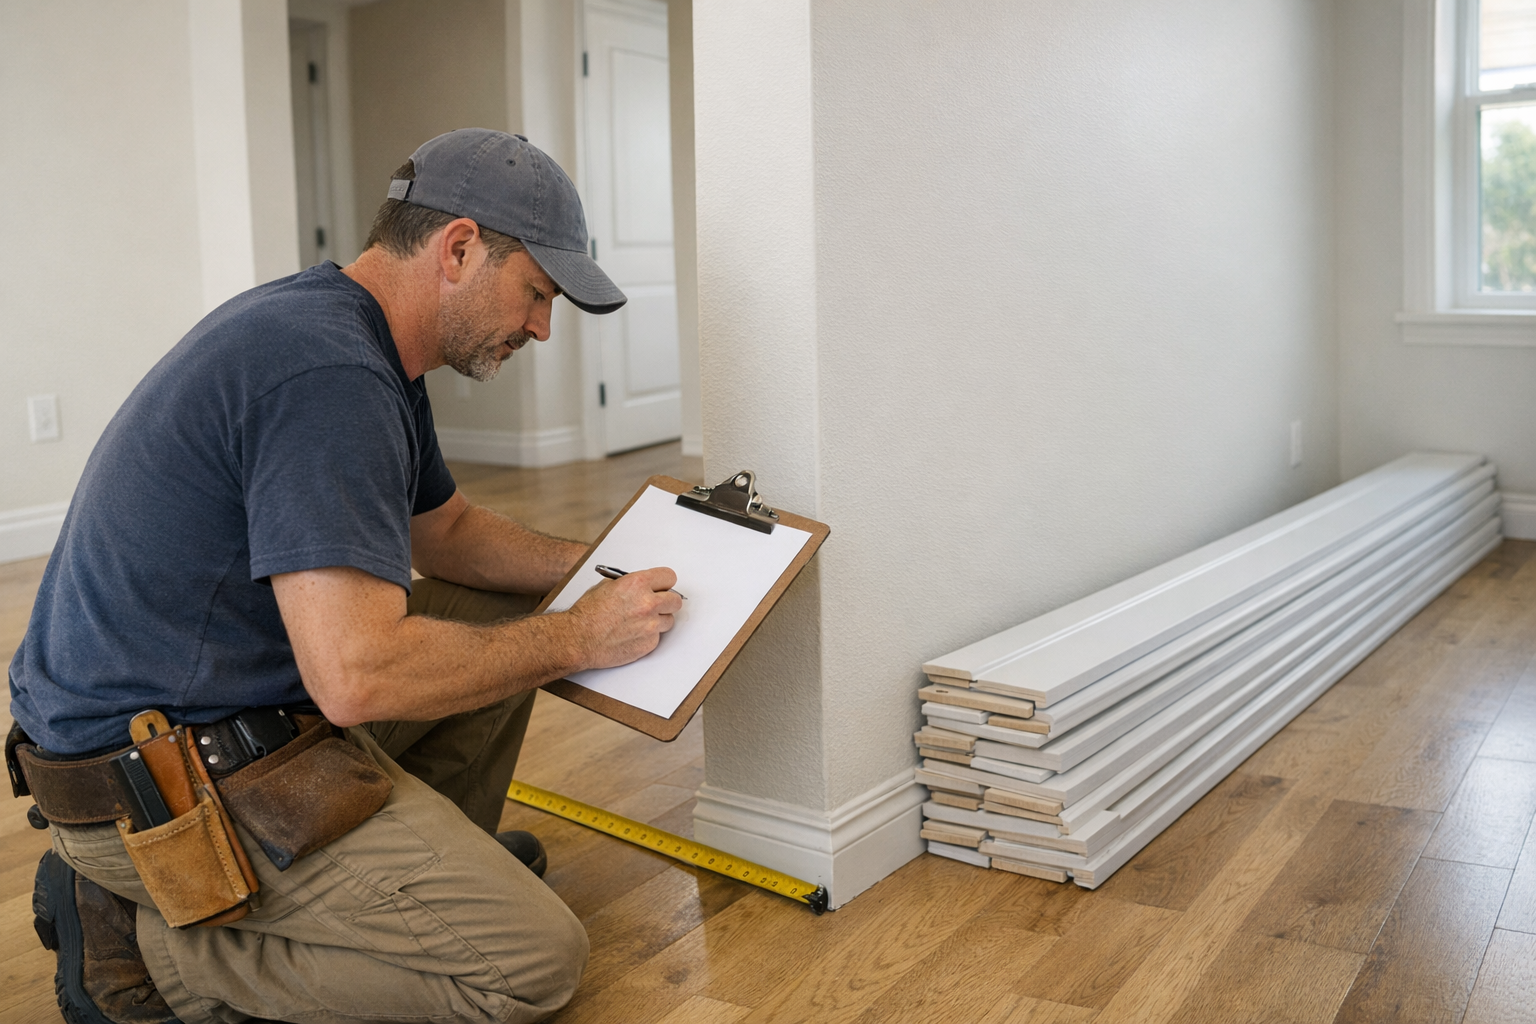
- Measuring and material planning: We measure the areas to be trimmed, account for cuts and waste, and help plan the right amount of baseboard for the project so the installation can be scheduled realistically.
- Old trim removal when needed: If existing baseboards are damaged, outdated, or no longer fit after flooring changes, removal can be included as a separate part of the scope before new trim goes in.
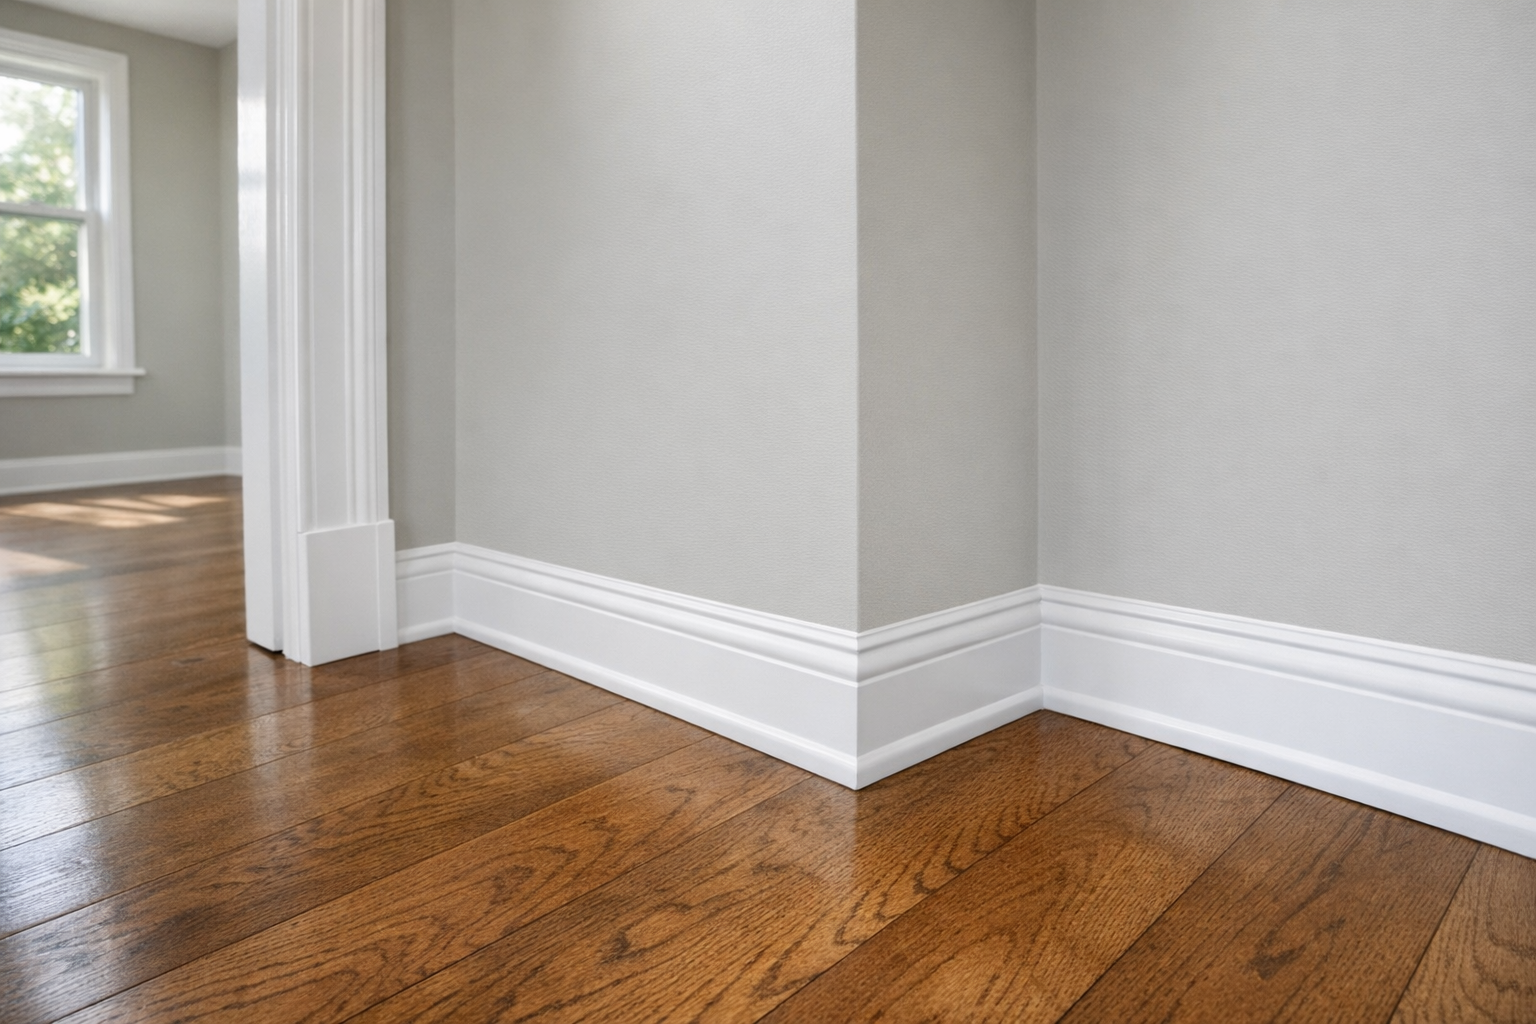
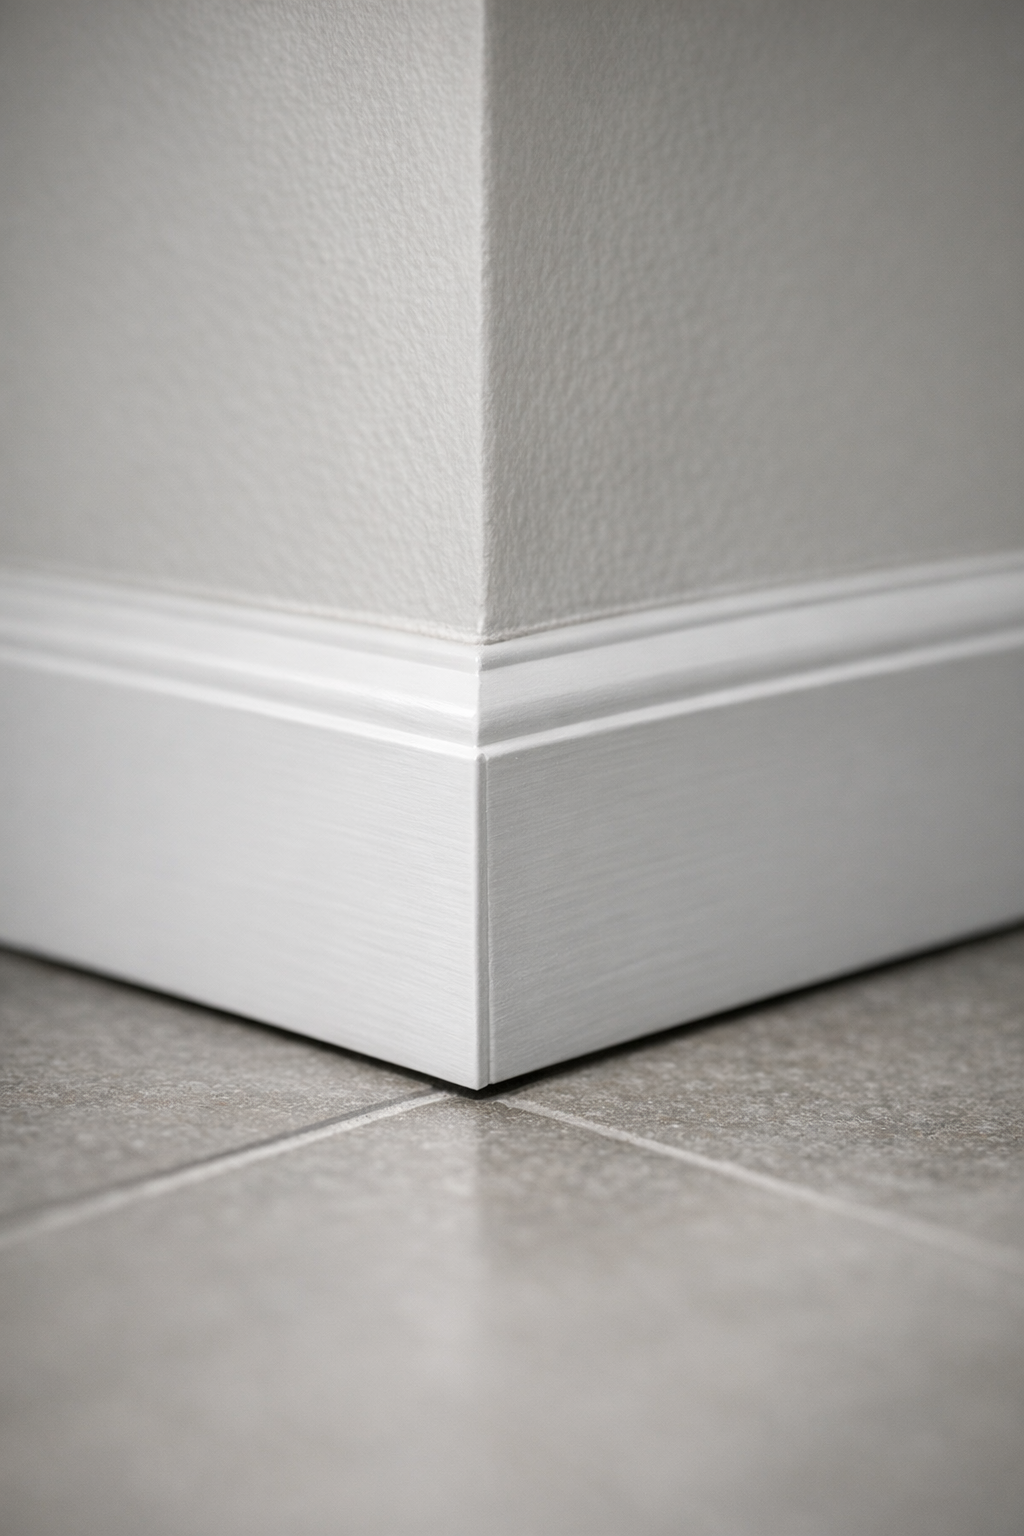
- Cutting, fitting, and corner work: Inside corners meet where two walls turn inward, while outside corners wrap around an exposed wall edge. Good trim carpentry keeps those profiles aligned so corners look intentional instead of jagged or pieced together.
- Fastening and surface prep: Once fitted, the trim is secured, visible fastener holes are filled, and seams are prepared for a clean finish. Strong results show tight joints, consistent lines, and baseboards that sit flush instead of bowing away from the wall.
- Caulking and finishing coordination: Paint-grade trim is designed to be painted, so smooth caulk lines along the wall and clean touch-ups are often part of the finished look. Stain-grade or natural wood trim is handled differently because the seams and nail filling remain more visible.
The final scope for baseboard molding installation depends on the home, the trim material, the flooring surface, and how finished you want the room to look when the work is complete. A simple room with straight walls is different from a whole-property project with uneven floors, many corners, old trim removal, and coordinated painting.
When to Install New Baseboards or Replace Old Trim
The clearest timing clue is usually what the room is already telling you. New baseboard installation makes sense when a remodel is wrapping up, new flooring has exposed rough edges, drywall repairs have interrupted the old trim line, or a room was painted after the baseboards were removed and never reinstalled.
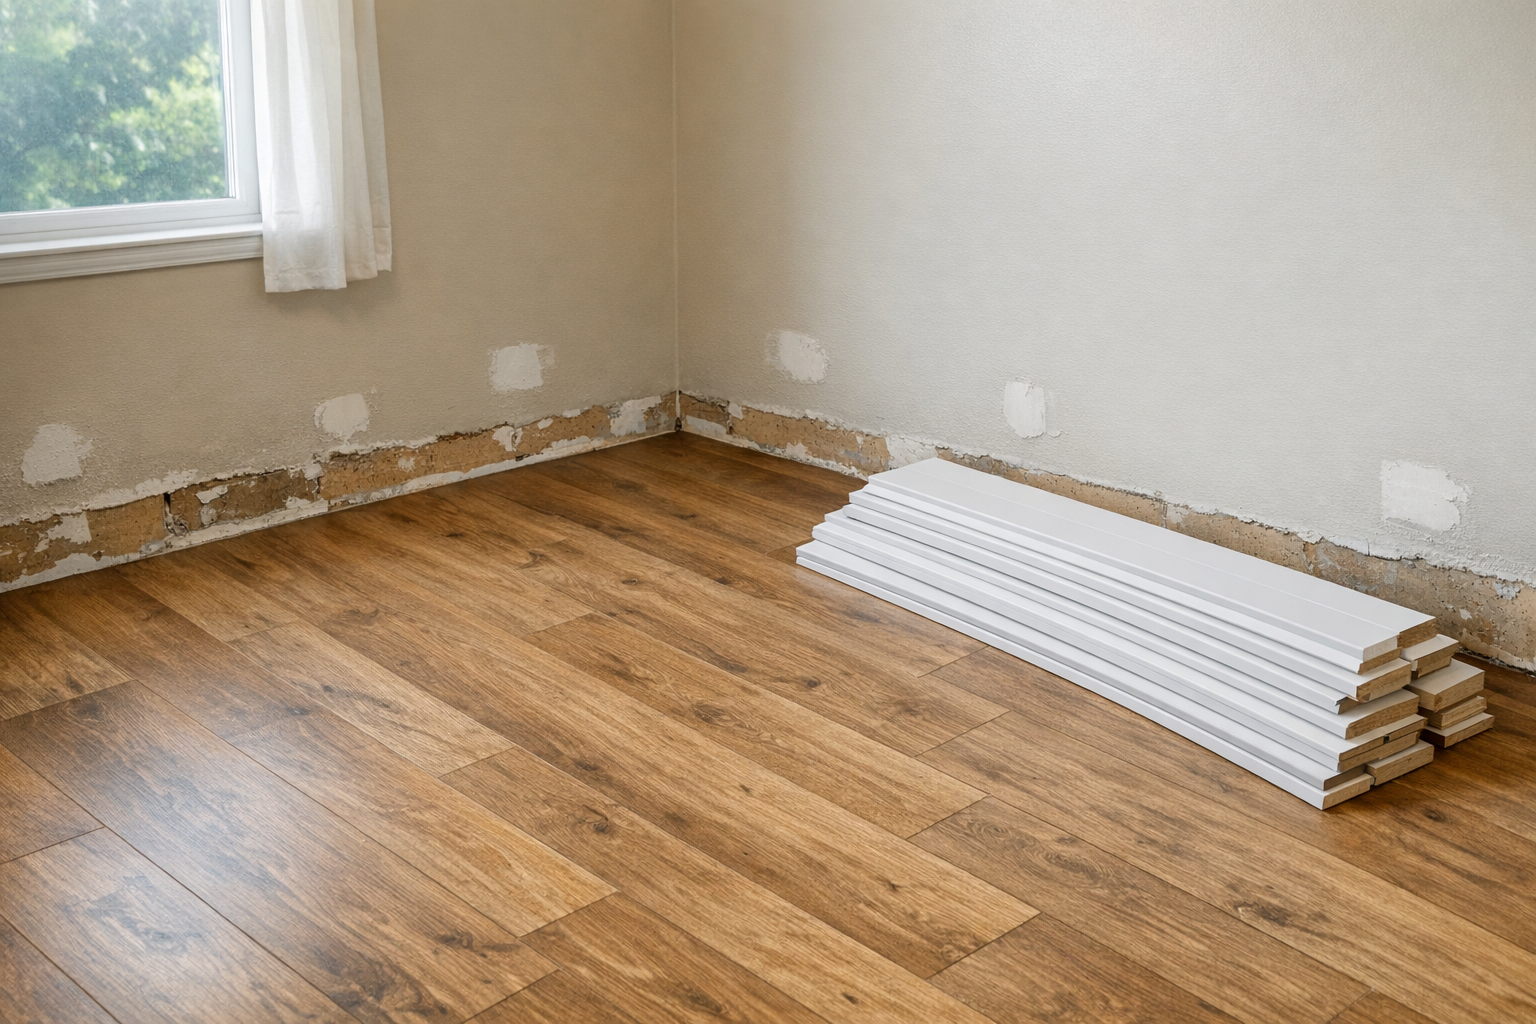
- Consider baseboard replacement when trim is cracked, swollen, loose, missing in sections, or separated at the joints. Those conditions change the scope because the old material may need to come off before the new pieces can be fitted and finished cleanly.
- A flooring project is another common trigger. If the new floor height, edge line, or expansion gap no longer works with the existing trim, replacing the baseboards can create a cleaner transition without turning the project into a full floor replacement.
- Outdated or mismatched profiles are worth addressing when one room has several trim styles, patched-in pieces, or a baseboard height that looks out of place after a renovation. Matching the profile across connected spaces helps the finish feel intentional.
- Property turnover, rental preparation, and post-repair cleanup are also practical times to handle baseboard replacement, especially where wall gaps, rough flooring edges, or removed trim make the room look unfinished.
In many cases, old baseboards can be replaced without replacing the floor, as long as the flooring is in suitable condition and the new trim can cover the edge cleanly. A site visit helps determine whether the project is a simple room-by-room trim update or a more involved fit-and-finish job.
Choosing the Right Baseboard Material, Height, and Profile
Material, height, and profile are where the project starts to look personal. The right choice should coordinate with the flooring, wall condition, ceiling height, and overall style of the room, while also fitting the level of finishing work you want included in the baseboard installation.
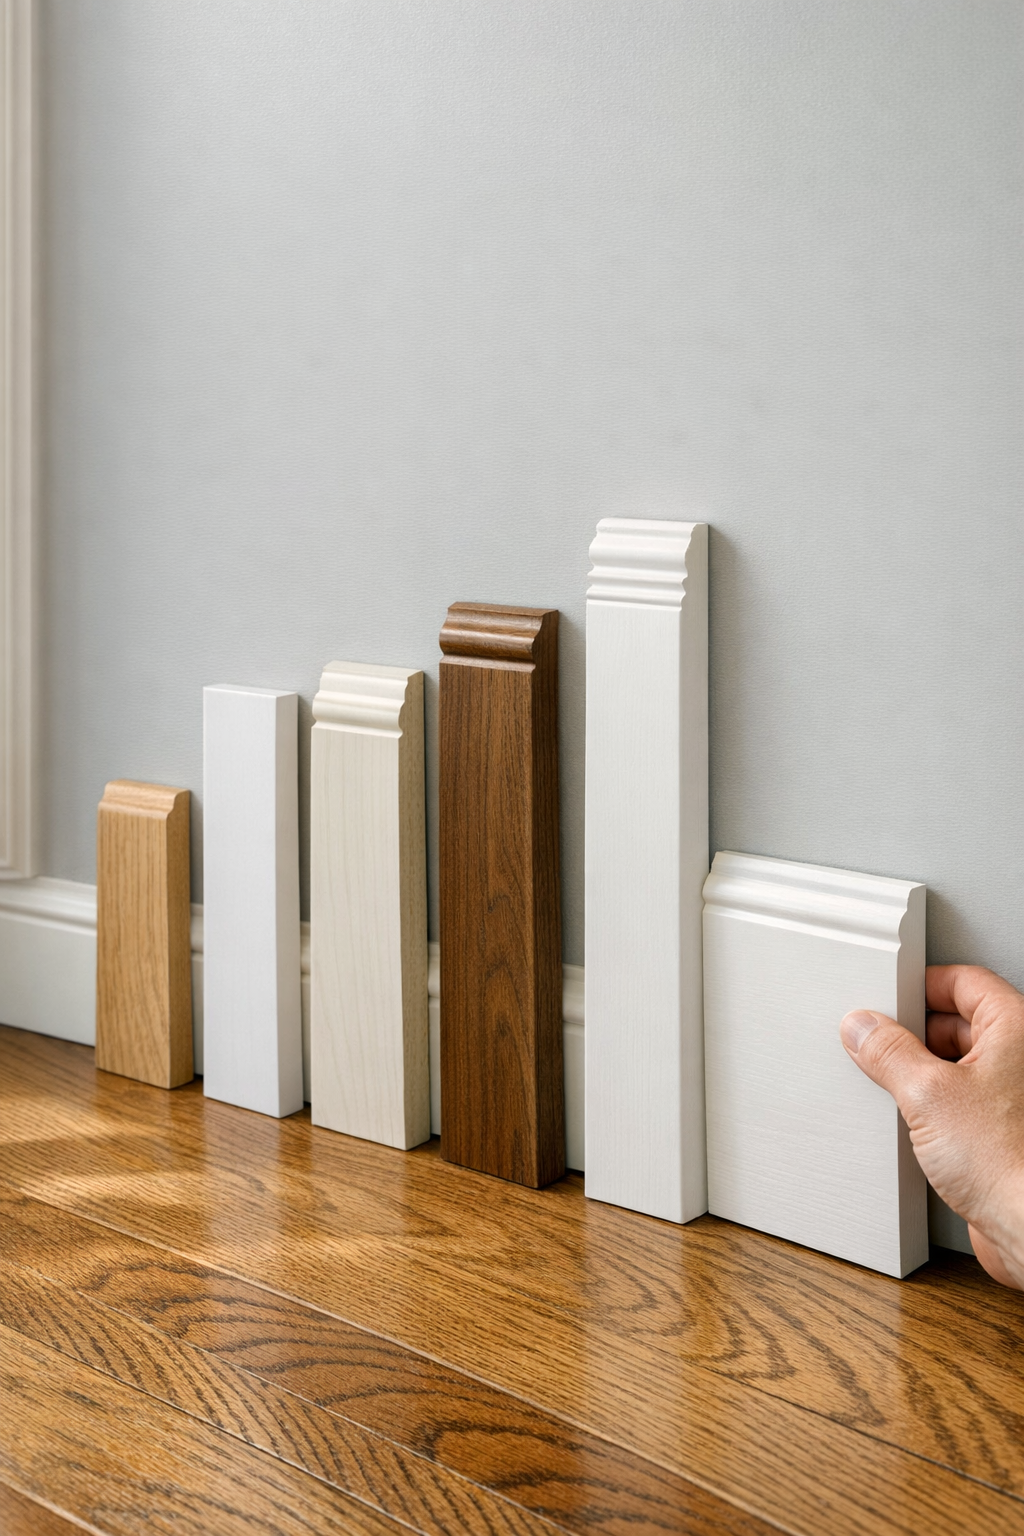
- MDF baseboards are commonly chosen for a smooth painted finish. They work well when the goal is clean, consistent trim without visible wood grain, especially in rooms where the baseboards will be painted white or another solid color.
- Wood baseboards are a stronger fit when you want natural grain, a stain-grade finish, or trim that matches other wood details in the home. Painted wood can also be used, but stain-grade material usually needs more selective matching because color and grain variation remain visible.
- PVC baseboards are often considered for moisture-prone spaces such as bathrooms, laundry areas, basements, and entryways. The practical takeaway is simple: the room conditions should influence the material, not just the look of the sample piece.
Painted trim is usually the most forgiving finish because nail holes, seams, and caulk lines can be blended into the final surface. Stained trim is less forgiving because the grain remains visible, so cuts, joints, filler choices, and finish consistency matter more.
Height and profile change the visual weight of the room. A simple, shorter profile can feel clean and understated, while a taller or more detailed profile can make the room feel more finished or traditional. More detail also means more attention at corners, transitions, and finishing, especially where walls or floors are not perfectly flat.
What Affects the Finished Result
The difference between "installed" and "finished" usually shows up in the small sightlines: how the trim meets the wall, how corners close, and whether the eye catches bumps, gaps, or uneven shadow lines as you walk into the room.
- Wall and floor flatness affects how tightly the baseboard can sit. A flatter surface allows a cleaner fit; uneven drywall, old adhesive, paint buildup, or sloped flooring may require extra fitting so the trim does not look wavy or pulled away from the wall.
- Corner accuracy matters because inside and outside corners are where rough cuts stand out first. Strong workmanship shows tight joints and clean returns; weak work shows open miters, crushed edges, or corners that look misaligned from one wall to the next.
- Scribe cuts help trim follow an uneven surface instead of forcing a straight board against a crooked floor or wall. The practical result is a closer, calmer line where the trim meets the room, especially in older homes.
- Seams, fasteners, and reveals are finish-quality checkpoints. Good work has blended joints, filled nail holes, and a consistent reveal along the top edge; weak work leaves visible joints, unfilled fastener holes, or height changes that make the baseboard line look choppy.
- Caulking and finish prep can either hide normal small transitions or call attention to them. Smooth caulk lines and properly prepared paint or stain surfaces look intentional, while excess caulk, rough filler, or uneven paint makes the trim feel unfinished.
A professional baseboard installation should account for the condition of the room before the final boards go on. If old trim removal exposes torn drywall, leftover glue, damaged paint, or flooring that dips at the wall, those details can change the fitting and finishing approach needed for a polished result.
Coordinating Baseboards With Flooring, Paint, and Final Touches
Scheduling the trim around the rest of the room can prevent small finish problems from becoming visible at the end. On many projects, baseboards are planned after hard flooring such as hardwood, laminate, tile, or vinyl is in place so the trim can be fitted to the actual finished floor height; carpet may be handled differently because the carpet and tack strip need room at the wall, and remodel sequencing can also shift the order.
Paint timing is another coordination choice. Pre-painted boards can make the main coating cleaner before installation, but cut ends, nail holes, seams, and caulk lines still need touch-up afterward. Painting after installation usually gives a more continuous finished surface, especially when caulk is used along the top edge, but it requires careful masking and a steady finish line where trim meets wall and floor.
Small floor-edge gaps do not always mean the baseboard was chosen incorrectly. Shoe molding is a narrow trim added at the bottom of the baseboard, while quarter round has a rounded profile; both can help cover minor expansion gaps or uneven flooring edges without replacing the main baseboard. The practical tradeoff is visual: these pieces add another line of detail, so they should look intentional rather than like a patch.
For larger projects, it helps to coordinate flooring, painting, and trim work before anyone starts to install baseboards. A site visit can clarify which surfaces are already finished, which still need touch-ups, and whether the project should be staged room by room or completed in one trim phase.
Cost and Timeline Factors for Baseboard Installation
The most useful estimate starts with scope, not a flat guess. Baseboard installation cost and scheduling are shaped by the number of rooms, total linear footage, material choice, profile complexity, wall and floor condition, corner count, accessibility, and the labor market for the property's location.
Baseboard removal and installation usually takes more time than installing new trim in an empty, prepared room because old trim may expose torn paint, damaged drywall, leftover adhesive, or uneven edges that need attention before the new boards sit correctly. MDF baseboards with a painted finish are often more straightforward to finish than stained wood or custom-profile trim, where seams, cuts, and color matching are more visible.
Timeline also depends on how much finishing is included. Cutting, fitting, fastening, caulking, filling nail holes, sanding, priming, painting, or stain touch-ups each add steps, and occupied homes may require room-by-room staging, furniture movement, and cleanup between work areas. A small room may be completed quickly, while a whole-home trim update or stained/custom project commonly takes longer because there are more transitions, corners, and finish details to control.
For accurate pricing and a realistic schedule, a project-specific estimate is the safest next step. It lets the installer measure the actual trim run, see existing conditions, and separate simple installation from repair-heavy or finish-heavy work.
Request an Estimate for Baseboard Installation
Ready to price the work? Send a few project details when you request your estimate so the installer can separate a simple trim run from a job that needs removal, repairs, or extra finishing.
- Room count and photos: show the size of the project, corners, doorways, wall condition, and any existing gaps.
- Approximate linear footage, if known: this helps estimate material needs, but final measurements can be taken on site.
- Old trim status: note whether baseboards are missing, staying in place, or need removal before new installation.
- Material, style, and finish preferences: painted MDF, stained wood, simple profiles, and taller decorative trim each affect the final look and finishing plan.
- Flooring type and timeline: hardwood, vinyl, tile, carpet, and remodel schedules can change how the baseboards are fitted and staged.
From there, a professional baseboard installation visit can include measurements, profile recommendations, finish planning, and scheduling. Request an estimate, share what you know, and you'll get a clearer plan for clean, consistent trim that fits the space.
FAQs
What does professional baseboard installation include?
Professional baseboard installation includes measuring the trim run, planning materials, removing old trim when needed, cutting and fitting corners, fastening the boards, filling nail holes, and preparing seams. Finish work can include caulking, paint touch ups, or stain coordination depending on the material.
When should old baseboards be replaced?
Old baseboards should be replaced when they are cracked, swollen, loose, missing in sections, separated at the joints, outdated, or mismatched. Replacement is also common after new flooring, drywall repairs, remodeling, painting, rental turnover, or post repair cleanup.
Should baseboards be installed before or after flooring?
Baseboards are commonly installed after hard flooring such as hardwood, laminate, tile, or vinyl so the trim fits the finished floor height. Carpet can be handled differently because the carpet and tack strip need room at the wall.
How much does baseboard installation cost?
Baseboard installation cost depends on room count, total linear footage, material, profile complexity, wall and floor condition, corner count, accessibility, and local labor rates. Removal, drywall damage, adhesive residue, caulking, filling, sanding, priming, painting, or stain touch ups add time and cost.
What type of baseboard is best for my home?
MDF baseboards are best for a smooth painted finish, wood baseboards are best for natural grain or stain grade trim, and PVC baseboards are best for moisture prone areas such as bathrooms, laundry rooms, basements, and entryways. Choose the height and profile based on flooring, wall condition, ceiling height, room style, and how much finish detail you want.